Shop Log - 9/21/22
Oof, I really don’t like going this long without updating the oId hobby blog but it’s better late than never, I suppose. I’ve had some trouble focusing on one thing these last few months and September has been especially bad. As far as where I’ve been, I spent the first week (and change) of the month visiting family in Ohio and I’ve more or less take a short break from crafting so as not to burn myself out from overwork for the second (or possibly even the third) time this year. And while I haven’t been working like a dog on any one thing on my perpetually growing mountain of projects since then, I have been working on a lot of different things in miniscule chunks. Here’s just a few of them.
But before I get into those, I did make a tiny bit of
progress on my ongoing Mr. Boneface project. I’ve come to think of this as a
more long-term project, since every new challenge I encounter with what I had
envisioned for the Mr. Boneface series of action figures has made it less and
less of the quick turnaround project that I’d initially intended it to be. It
turns out that making action figures is very hard and incredibly time consuming.
Whodathunk it?
I did, however, make some thermoplastic “foundations” out of
worbla for two of the wearable accessories. I wanted to ensure that the
wearable accessories conformed to the shape of the figure in the way that my
previous attempts at these failed, so I used some of my cast-off figures (using
the same Buck body as my Mr. Boneface figures) as mannequins while I heated up
the worbla. The plan here is to sculpt the details on top of these worbla
foundations. We’ll see how that goes.

And speaking of my MOTU bootleg buck molds, I felt the
unexplained urge to use those very same molds to cast a He-Man and Skeletor in
semi-translucent, glitter infused green and pink (respectively). I like the
gummy candy look of these figures and the people I’ve shown them to seem to
like them as well. I want to gauge whether or not there would be an audience
for these things, just simple translucent “gummy” figures with no fancy header
card (packaged in a simple poly bag), one accessory, and possibly two
interchangeable heads as smaller ticket item for me to get out there while I
continue working on my more involved projects like the Mr. Boneface series and
my other, more original sculpt-heavy designs that I’ve been picking away at
(like the one I’m about to unveil).

I guess you can think of the remainder of this Shop Log as a
kind of preview of coming attractions, as I would ideally like each of these
projects to be their own separate article when I’m done (whenever that may be).
I’ll start off with what is probably my most ambitious (and ridiculous) one to
date: an articulated Mechaburger action figure heavily inspired the fake mascot
from Saints Row 2022. Personal feelings about this game aside, I love the
design of this guy and his G1 Transformers energy (plus, it doesn't hurt that he looks so reminiscent of Mirage and Sideswipe, two of my favorites). Here’s a screenshot I took for reference.

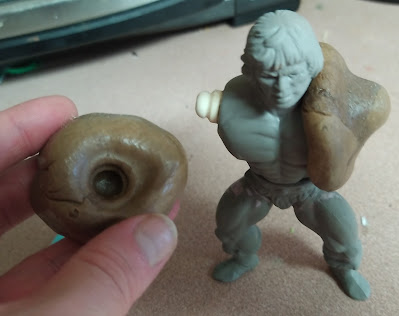
I haven’t made a TON of progress on this beyond some initial conceptualization, though I did make a urethane resin copy of these legs and arms from a 6” Optimus Prime PVC figure to serve as foundation for which to build upon. While I’m still very much in the initial planning and mock-up stages, I envision the final product to be derived from a mix of heavily modified kitbashed parts and original sculpts.
I started sanding down and trimming off the more recognizable
details and added a ball joint to the waist, one taken from another one of my
cast-off figures made using my aforementioned MOTU bootleg molds. I took the
neck joint from an extra urethane casting that once belonged to a torso mold
from that same set (that’s the smaller white ball joint you see in the pic). I
was about to use the arm joints from that same buck body as well, but since
this figure (if I indeed decide to stick with a 6” scale version of this idea) will
have arms that are quite a bit bigger than my MOTU bootlegs, I thought it might
be better if I nick the arm joints from a larger figure as well.
Luckily, I had some an extra pair of arms that I duplicated
from an actual He-Man figure (instead of the typical knock-off Combo Hero/MOTU
bootleg buck that you’re used to seeing me use) from a different project that I’ll
be talking about later on. I laid out next to the robot arms and took some
measurements with my caliper as I tried to get a sense of not just the position
of where to put the socket holes where the ball joints will go on said robot
arms but also the depth of the sockets.

For the ball joints themselves, I tried molding them using
ImPressive Putty that I formed around the joints on a vintage He-Man figure
that I was working on and while that worked okay just to have some joints on
hand for dry-fitting various pieces to my conceptual/rough sculpts, I’m not happy
with the consistency of the castings made from ImPressive Putty. I’ll probably end
up just making a proper mold of an entire vintage MOTU torso, taking the joints
directly from castings made from that, and then probably making smaller molds
of just the ball joints themselves. Plus, I’ll probably have use for a vintage
MOTU torso mold for future projects (especially as I begin working more with
Monster Clay to modify existing sculpts) as I already have molds that I made
for vintage MOTU arms and several different heads in my mold library.

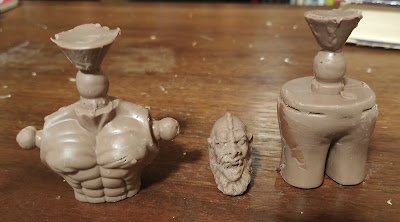
I also made a rough sculpt of Mechaburger’s torso out of
polymer clay, mostly for fun and practice, but also to get a sense of the
overall proportions and help me to visualize how and where to position the
articulation joints when I start sculpting this project for real. Like I said
earlier, this will be a very involved, long-term creative project and I haven’t
truly started to delve into it quite yet. But much like my ongoing Mr. Boneface
project, I suspect this one will also teach me a lot about the toy making
process when it’s all said and done.

I have no shortage of shorter term, one-off side projects as
well. Like this vintage MOTU Prince Adam beater figure that I got on eBay for a
few bucks. It had no arms and a half chewed off nose, so I figure that it might
be a fun challenge to mold and cast it a new head and a pair of arms in Flex It
90. Its repro parts I temporarily borrowed from other figures in my collection,
particularly a Battle Armor He-Man for the head and a Man-At-Arms figure for the
arms. Again, I’ll go into that whole process when I finish this project up and
give it is own article.

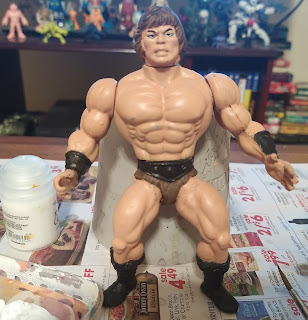
After giving the figure its replacement head and arms, I
decided to give it a new paint job as well and redeco it as my own custom version
of Wonderbread He-Man aka WunDar. I already made a custom Dollar Tree miniature figurine of that character quite some time ago but I want to go one step
further with this project. For now, I started painting this custom’s basecoat
and I’m liking where things are headed so far. After I finishing painting him,
I plan to give him his classic maroon-colored weapons and black Zodak armor,
which I also have mostly done and will elaborate on more in this project’s
stand alone article.

I’ve also been messing around with some new sculpting mediums,
continuing to dabble with Monster Clay now that I finally have a crockpot to
more effectively melt the stuff. Here’s some more examples of me pouring liquefied
Monster Clay into some existing silicone molds and letting it harden. I still haven’t
gotten the chance to actually try sculpting with Monster Clay, but the way this
stuff holds its shape is really amazing to me considering how easy it is to
manipulate and smooth over certain details with just a little bit of heat
applied.

I also bought (and have since expended) a little trial packet of CosClay, as the idea of a polymer clay that remains flexible after you bake it was intrigued me after I saw the Crafsman’s video on the material. Here’s a He-Man harness that I pressed into some Oyumaru thermoplastic and attempted to duplicate with CosClay before attaching it to a resin copy of my standard MOTU bootleg torso.
As you may recall from previous Shop Logs, I’ve deemed making removable
MOTU/MOTU-inspired armor for action figures to be pretty much impossible (at least
for me, anyways) so going forward, if I want a figure to have armor, I’ll be sculpting
it (or copying it) directly onto the torso like pretty much every other kind of
action figure you’ll come across that isn’t MOTU. Due to CosClay’s flexible
properties, I figured it might be a viable option to mold in the shape of the
armor, bake it until its cured, and then permanently attach it to the torso prior
to making the mold.
That’s what the point of this little exercise was, though I’m
leaning more towards doing this same process with Monster Clay as it’s easily
more cost effective in the long run. CosClay is still pretty neat though and it’s
what I used to make a rough copy of the Zodak armor that I’ll be using for my
above-mentioned Wonderbread He-Man custom. I might work with stuff more in the
future and I might not.

To cap off this Shop Log, I recently purchased a gallon of
the cheapest silicone rubber I could find on Amazon because I wanted to make molds
of some seemingly random stuff that I had lying around (namely a M.A.R.S. robot
toy with interchangeable parts, a Mexican bootleg Lion-O, and a 3D printed Perseus
figure from Clash of the Titans that I got on ebay, and a random yardsale Power Ranger that isn’t pictured here). I bought a gallon of the cheap,
crappy Startso World stuff because I didn’t want to dip into the last remaining
gallon of my good Cast-A-Mold 25T silicone, since I’m saving that for my more
serious projects (insofar as making your own bootleg toys can be considered
serious). These are just things I’m messing around and experimenting with because
I thought they might make decent buck systems for smaller scale figures.
I made some funnels/pour spouts out of some leftover polymer
clay and in the pic below, I glued them and the air vents to all these random
parts. For more details on how I set up my parts before I mold them, check out
my article on how I make my one-part silicone rubber cut molds.

Until then, stay tuned for more updates. I hope my next post isn’t as embarrassingly delayed as this one.


Comments
Post a Comment