Shop Log – 8/15/22
Oof, I guess I missed a week. One of my goals is to upload some kind of blog post at least once every seven days, but what can I say? I was busy. I’m still busy. Here’s some of what I’ve been up to…
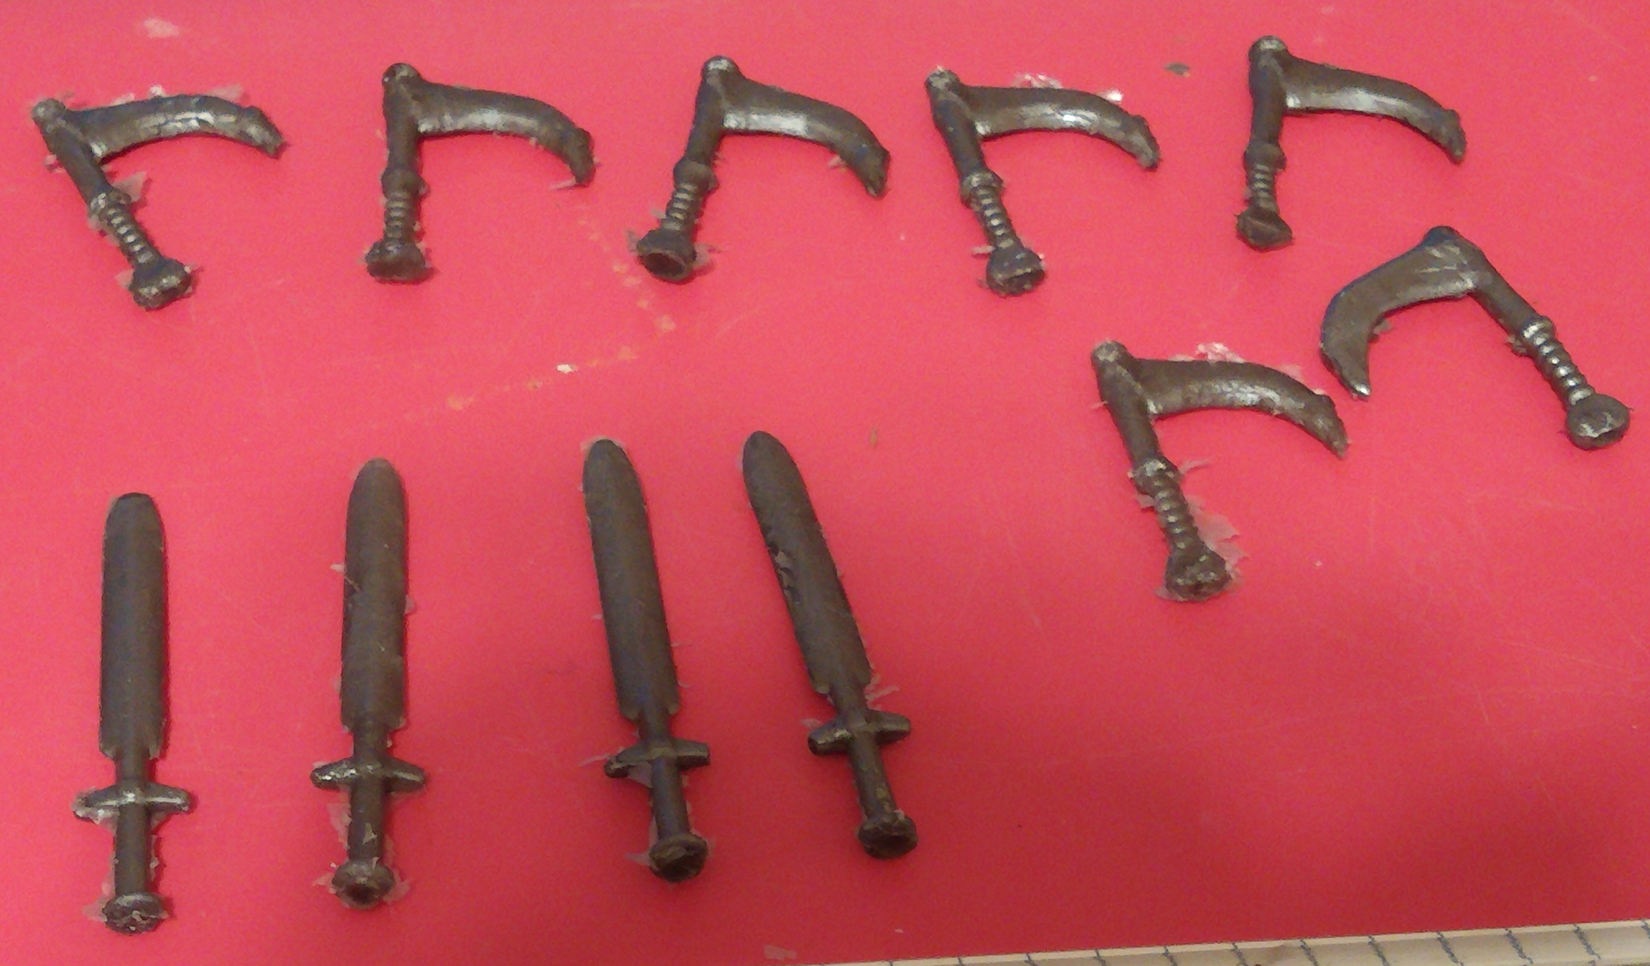
I finally kitbashed the last weapon (well, next-to-last as you’ll see later on) for my Mr. Boneface figures, giving the I, Mercenari-inspired design his handheld sickle. The blade I sculpted out of polymer clay, when ended up looking much better than the previous attempt that I made from Green Stuff and ultimately ended up hating.

After making a silicone mold of said sickle, I tried out
some metallic mica powder for the first time to pigment the resin and I really
like how it looks. I also molded and cast five copies of this cool sword in the
same batches. I decided to throw out the nunchuks I previously made for the
Toxic Slime Pit Mr. Boneface design and I’m giving it this sword as a pack-in weapon
instead. I just couldn’t attach the little bit of chain in a way that I thought
looked good, so I just decided to say screw it and give those figures a sword
instead.
I also started casting the display stands for the figures, but it will be quite some time before they’re done since I’m going with a slower-curing rigid urethane resin, Specialty Resin and Chemical Model Pro Slow, because it fully supports the weight of the figure without it leaning or tipping on its stand. As I mentioned in my previous entry, I wasn’t happy with the weight balancing issues that stemmed from casting the stands in the same lightweight Flex-It 90 as the figures and rather than tinkering with it any more, I’m just going to cast all fifteen stands in Model Pro Slow. It’s 3-4 hour cure time will mean that I can only cast a few stands in a day (maybe two at most given everything else I have to do in a day), but I’ll see how many I can pump out by the end of the week.
Yeah, I could have purchased the non-slow version of Model Pro and only had about an hour or so for the cure time, but I wouldn't have the 12 minute potlife that Model Pro Slow affords me and after running myself ragged trying to get everything mixed, poured, and in the pressure pot in under three minutes whenever I'm working with Flex-It 90, I like not having to rush for a change.
Oh, and don’t expect consistent colors on the bases, since I’m
just eye-balling the resin dyes here and because of the way the pigment bottles
are set up, it’s never going to be as exact as I want it to be anyway. Think of
it as a fun bit of variety that makes each figure that much more unique. I don’t
know, but I’m most certainly not doing these stupid bases over for a third time.

Which brings me to the very last pack-in accessories that I’m
including with the Mr. Boneface figures. The soft goods/wearable accessories. For
one of them I downloaded a cape pattern off of Toy Polloi’s site and modified
it in photoshop before printing out a copy on cardstock paper for test fitting
purposes. As I might have mentioned in previous Shop Logs, the plan is to test
fit with paper copies until I find the right pattern, trace the pattern onto a
sheet of styrene plastic, sculpt additional details onto it as necessary (like
a neck clasp for this cape), make a silicone mold, and cast them in Flex-It 40.

For another wearable accessory, I downloaded yet another
pattern off of Toy Polloi’s website and scaled it up in photoshop to better fit
a 5”/5.5” scale MOTU-style figure (this original pattern is for a Stormtrooper
pauldron). I think this one will go to the green Toxic Slime Pit Mr. Boneface
for lack of any other ideas for a wearable accessory for that particular design.
I’m definitely going to modify this overall pattern a little more but I’m
looking forward to sculpting on additional plates and other little details
(possibly spikes/studs, maybe a tiny skull on the chest piece).

And finally the executioner-style cowl for the I, Mercenari
design. This one, I pretty much had to draw from scratch in photoshop but I
think the pattern out looking pretty good. I don’t forsee the need to sculpt
any details onto this one, just cast it in a shade of purple and call it a day.

As I edge closer and closer to the finish line for my Mr.
Boneface project, I can’t help but reflect on all the things I would have done
differently. Namely, I probably wouldn’t have decided to make my first real art
toy/action figure project an entire wave of figures (even if it is just a tiny
of run that consists of fifteen pieces). If I had to do it again, I probably
would have just taken one design and focused on just making five copies of that
rather than a set of three designs with five copies each (and each one with
their own accessories, soft goods, display stand, etc). All that said, I’m
still going to see this project through to the end, make it as good as I can
make it, and not cut any corners. Because everything I’m learning on the Mr.
Boneface project will make the process so much easier and less painful for my
next figure (and yes, I used the singular it will be a one-off rather than an
entire wave).
Speaking of my next figure, I’ve been coming up with all
sorts of ideas that I’m really excited about. One I’ve been actively working on
is a vintage MOTU-scale figure based on a Monsters In My Pocket figurine from
the 90’s: Blaster of the Universe from the MiMP alien series. Since the
original Monsters in My Pocket figure (the lime green guy pictured below) is so
clearly inspired by He-Man, I thought it would be a fun idea to make a full-sized He-Man
style action figure of this character. While the head sculpt, weapons, and
belts/bandolier will all be new designs and molds, I’m using my existing
MOTU-style buck body (the same one I used to cast my Mr. Boneface figures) for the
arms, legs, and torso.
With that in mind, I set about sculpting the head from
scratch using polymer clay. Before adding any clay, I wrapped my aluminum foil
armature around the neck joint of this urethane-resin casting of my standard
action figure torso to try and keep everything in scale and make sure the neck
socket wouldn’t need to be added after the fact (which is almost always a pain).

Pictured below on the far left was my first attempt at
sculpting a Blaster of the Universe head, which I screwed up by not making the
forehead high enough. But it was good practice for the head sculpt that I would
ultimately make a silicone mold from, though the polymer clay original sadly
did not survive the molding process. But from that mold, I cast my first two
copies in Flex-It 90 resin, the first one in green (my “test shot” casting to
season the mold) and another one in blue. While it just so happens that the
original Blaster of the Universe figurine that I own is the lime green variant,
supposedly the blue one was the more common version of the figure back in the
day.

I was so pleased with the end result that I ended up casting
the entire figure in blue before making another in yellow. For that one, I
tried to get the color close to my original MIMP figure’s lime green color but
the yellow dye completely overpowered the few drops of fluorescent green resin
dye that I mixed in. But again, these are just prototypes for now so I’m not
too peeved about it. If I do decide to release this as my next figure (again,
thinking of a five copy run), I’ll probably go with the blue anyway and if it
sells well (or even sells at all), I’ll think about doing the neon green and
lime green variants.

I’m still working on my sculpting beyond just action figure head
sculpts. I even began my first real attempt at a chibi figure in polymer clay.
Note that the head is that weird (almost veiny-looking) marbled look because I
recently found some Premo Super Sculpey on sale that was in this pearlescent
color and I just wanted to see how it would look. Obviously, I still need to
sculpt the face, hair, clothes, and the little sword I want it to be holding.

While I continue to practice with polymer clay, I also recently
purchased some Monster Clay, which I’ve had my eyes on for a long time. What
really excites me about this stuff is the ability to melt it into an almost
liquid form and pour it into existing silicone molds and modifying the sculpts
from there. Plus, I’ve seen people on youtube melt it down and use it as the
clay in two-part “clay up” silicone molds, which would essentially replace the
cheap modeling clay I’ve been using up until this point. That could potentially
reduce the severity of the mold lines I’ve often encountered in my previous castings
that I’ve made from two-part molds (which is a big reason why I almost
exclusively use one-part/cut molds now).
I haven’t really had too much time to actually sculpt with
Monster Clay, though I’m really looking forward to it. From my initial
impression, it has this unique waxy but still solid feel to it that is very
unlike anything else I’ve tried sculpting with before (Green Stuff, Milliput,
polymer clays, Apoxie Sculpt). However, I don’t think I’ll be able to do too
much with it right now since I need a crock pot not only to keep it warm and
malleable when I’m working with it, as it firms up to its rigid state
remarkably fast. I especially need a crock pot to render the Monster Clay down
to its fully melted state so that I can pour it into molds.I attempted to do in
my oven, but even after forty minutes at recommended heat settings, it still
isn’t able to be poured.
The good news is, I recently got word from my mom that she
found me a nice crockpot at a garage sale for 75 cents, but I probably won’t be
visiting home again for at least another few weeks when I take some time off
for Labor Day. So the Monster Clay will have to wait until after I get back.

I did, however, manage to heat it up enough in my over to crudely stuff into a couple random molds despite still being in a mostly solidified state. I’m excited for the potential here to modify and customize existing sculpts that can, in turn, be used to make new molds. While the figures come out of the molds easily enough without pieces falling off or surfaces getting warped, it's relatively easy to smooth and shape the features. It’s certainly more efficient and cost-effective in the long term than my previous idea to modify urethane resin-casted “blanks” that I mentioned in a previous Shop Log, though I still intend to use up all the bags worth of blank parts that I’ve casted to date. But as I get more and more comfortable with sculpting, I feel like Monster Clay is going to be the way to go rather than just sculpting over urethane blanks with Milliput and Green Stuff.

If you’re wondering why I don’t have any side-projects for this week’s Shop Log, it’s not that I don’t have any going on. Quite the opposite, in fact. My plan going forward is to start once again posting separate articles detailing these side projects (random resin castings and repaints, one-off action figure customizations, crafting experiments, etc) while continuing to post Shop Logs that focus primarily on my major projects and general practice/skill building activities. That’s the plan anyways, we’ll just have to wait and see how the rest of this month plays out and if I have any more free time to devote to crafting and my many, many other projects. I'm not going to hold my breath.


Comments
Post a Comment