Shop Log - 7/2/22
I’m taking some vacation time (nine days off work in total) so I’ll hopefully be able to get caught up on some of my more pressing crafting and writing projects. But for this Shop Log, I’ll give a brief update on where I’m at with my Mr. Boneface project and then get into some of my little side projects that I wrapped up over the course of the last few weeks.
For one thing, I did manage to cast all five copies of Toxic
Slime Pit Mr. Boneface, the first of my “finalized” designs for Wave 1 of the
Mr. Boneface series. Granted, there’s still some minor cleanup to do, the painting
prep, the paint apps themselves (which I mentioned in my previous Shop Log),
and whatever I ultimately decide to do for accessories before they’re ready for
packaging, but the base figures themselves have all been cast.

Before moving onto the next stage with my Toxic Slime Pit Mr. Boneface, I’m going to instead move on to casting all the parts for the next figure in the series. I’ve decided to make this next Mr. Boneface an homage to a character that’s proven exceptionally popular amongst MOTU bootleg and knockoff enthusiasts like myself. I’m talking about Dethlor from the highly sought-after Speclatron line. The plan is to cast his head, legs, and arms in purple (which I’m mixing myself from red, blue, and white SRC brand resin pigments) and do a semi-translucent torso with blue, red, and/or purple glitter mixed in with the resin. For the paint apps, I’m going to go with a bright green for the wrists, trunks, and boots to stay true to the original figure’s palette. It’s unfortunate that Flex-It 90 resin is, by default, that golden amber color that prevents it from being crystal clear like the original toy’s torso but I’m thinking I might like to tint it with transparent black and red epoxy resins or perhaps a darker gray to give the glitter a kind of cosmic or starry galaxy look.
But before I worry too much about that, I want to cast all
the purple parts first and mixing the right shade of purple has proved to be a
challenge in its own right. It would be nice if I could just mix my acrylic
hobby paints with the resin (Army Painter Alien Purple would be awesome) but unfortunately
no. I tried that once with my initial foray into casting with flexible resin
and I do not recommend it under any circumstances. Mixing acrylic paint with
Flex-It 90 resin turns it into a bubbly, frothy foam that can turn a mold into
an elementary school science project volcano. But I digress.
The one on the left was my initial casting in purple but I
wasn’t a fan of how much he ended up looking like a piece of Hubba Bubba Groovy
Grape gum so I had to try again. I think the one on the right, where I used
mixed more blue and less red, is probably as good as I’m going to get it.
Obviously, that semi-translucent green torso isn’t indicative of the final
design, it’s just what I had on hand for the picture. Keen eyed readers will
recognize this torso from my attempt to cast a translucent blue figure in my
previous Shop Log. And between that one and Hubba Bubba Mr. Boneface, I’m
thinking I could have an entire subline of one-off “reject figures” that result
from my various pigment tests prior to batch-casting my final parts. Maybe as a
bling bag series with a random mystery figure (at a discounted price) in every
one?

As I continue cranking out the parts for my Mr. Boneface
figures, here’s some of those side projects I mentioned earlier. The first of which
is yet another custom Final Factions figure from the Dollar Tree. This time, it’s
the new(ish) figure Amari. Pictured below is the default the figure straight
out of the package. I knew right off the bat that there were two things I
wanted my custom to change: the color of her gaudy gold bomber jacket and that
awful hair.

After disassembling, cleaning, and priming the figure with
Bulldog adhesion promoter, I started repainting the jacket to look a little
more like an actual military field jacket (Citadel Steel Legion Drab). I
painted the bodysuit gray and gave her some camo pants (because I can’t help
myself, I gotta paint camo on a figure) using a gray-green as a midtone and a
darker gray (Castellan Green with a bit of black). For the lighter layer of camo
splotches, which you’ll see in the next photo, I used Citadel Deathworld
Forest.
Before reassembling the figure, I dremeled off her hair and
sculpting some dreadlocks with a half shave using Green Stuff. From there, I allowed
the Green Stuff to cure before I painted the hair black (dry brushing black
over the half-shave stubble as well. I wiped off the factory-painted eyebrows
with some acetone on the end of a q-tip and painted in the eyes with my typical
method. That is, paint the eye area black, go over the eyes themselves with
white, hold my breath and then add the dark brown irises and black pupils). I
left her flesh tone the default factory color.

I thought about giving her face some warpaint to complete
her look, something like Senua from Hellblade, and started with a black layer
that I was going to paint over with blue or red but I wasn’t happy with how it
looked so I ended up wiping most of it off. I thought this looked pretty cool
on its own, like sniper eye-paint that got partially rubbed (or sweated) off
during the course of a battle and gave her a nice bit of shading around the
eyes. So I left it alone and moved on to shading the rest of the figure. I
applied an Athonian Camoshade wash to the camo pants and a black Nuln Oil wash
to everything else. I kicked around the idea of doing some drybrushing with the
base colors, but I decided just to leave her “dirty” and sprayed the figure
with a protective matte clearcoat. This was, after all, just a quickie project
and I was ready to move on to the next thing.
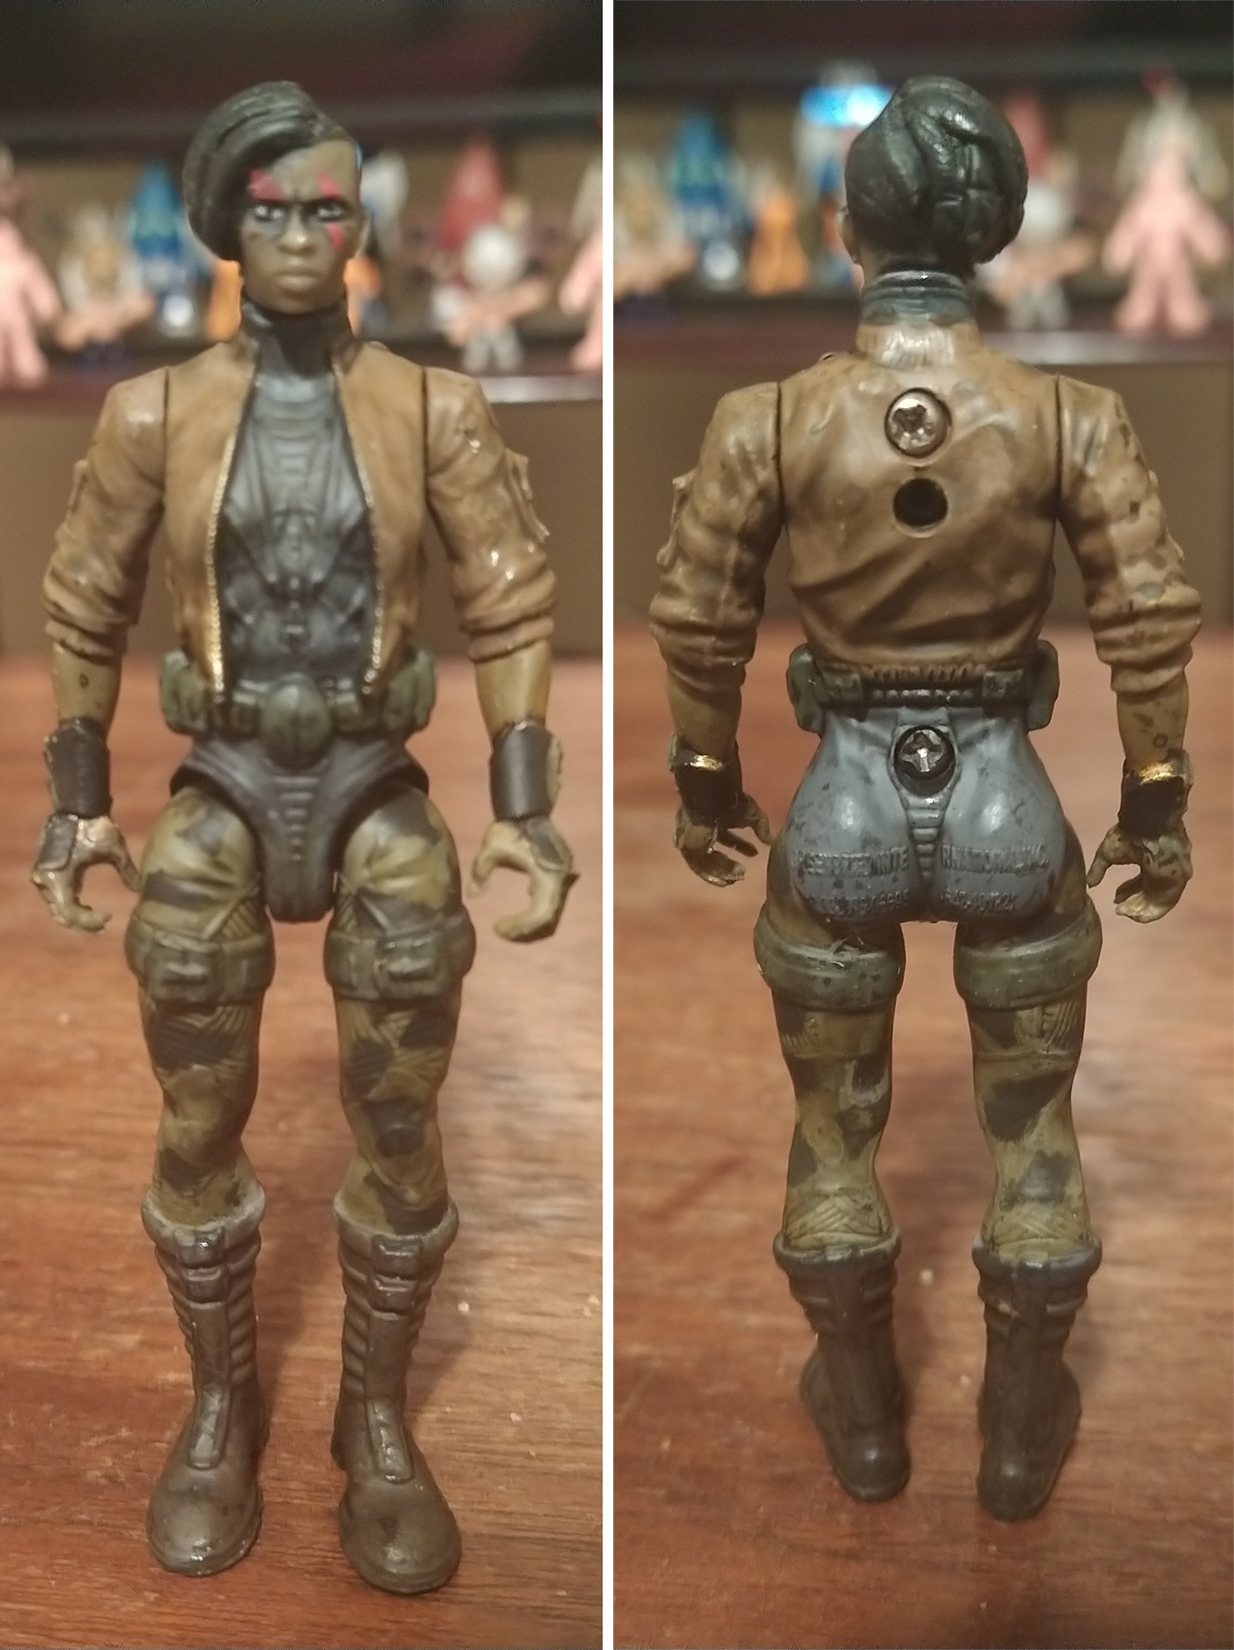
Here the before and after shot of my custom Amari:

There was another side project, but this was one I finished
up quite a while ago. I kicked around the idea of giving this one its own post,
but decided against it since I don’t have a ton of time and there isn’t a lot
to say. That said, I finally finished that Conan the Cimmerian “statue” that I
made from a bootleg He-Man figure that I cast entirely in hard epoxy resin in a
ridiculous one-part mold as part of that DIY Mold Making Material article that
I posted all the way back in February. It may or may not have popped up in a
few What’s On My Desk updates in the months since then, but it was only a month
or so back that I finally finished painting it.
Again, this was many months before I even considered getting
a pressure pot, so the casting wasn’t the best. There were some obvious air
bubbles that I had to fill in with some Apoxie Sculpt.

From there, I modified the head and hair with some precision
dremeling and additional sculpting. I altered his hair to look more like the
iconic barbarian as he’s commonly portrayed in cover art and comics. I sculpted
him a necklace out of Green Stuff and a belt out of Apoxie sculpt that I
detailed with some dollar store rhinestone stickers to represent the studs and
a resin casting of a Mega Construx He-Man shield as its center piece. I made the
loincloth out of some scrap pieces of worbla.
For his weapons, I had an epoxy resin casting of a shield
from a random Roblox figure and the sword came from a Hercules: The Legendary
Journey toy. I tried casting that in resin as well, but none of my efforts
turned out like I’d hoped (again, largely because I wasn’t pressure casting
them) so I ended up just gluing the sword into his hand. His stand/base came
from a Hiya Toys Predator figure that I made several epoxy resin copies of
after pressing the original into some Composimold ImPressive putty to make a
basic open-face mold. I superglued the figurine onto the base and primed the
entire thing first with Duplicolor Adhesion promoter and then in flat black. Prior
to that (before I really started sculpting), I had the figure primed in a flat
gray, but I decided a black undercoat would serve me better for the next stage.

Basecoating the figurine was a lot of fun. I found that a
50/50 mix of Reaper Harvest Brown and Army Painter Barbarian Flesh gave the
exact skin tone that I was looking for. Most everything else was a mix of
Vallejo earth tones and Citadel metallics (specifically Runelord Brass and
Leadbelcher). The base was a quick but satisfying dry brush job with gray that
was mixed with a drop or two of white, which I find always has a neat effect
when you’re working with a black undercoat.

From there, I added a quick wash to the figure using primarily
Reikland Fleshshade for the skin, Agrax Earthshade for the clothes and base,
and some Vallejo dark rust wash for the sword, belt, and shield. I dry brushed
on some quick highlights, mostly over the skin using the base color mixed with
a drop of either white or Vallejo basic fleshtone (I can’t remember which) to
lighten it up ever so slightly. After that, I hit the figurine with a glossy
protective clearcoat to wrap this long-standing straggler project up.
And here is the final piece side-by-side with the original
bootleg figure (excuse the oxymoron) that, coincidentally, also serves as the
master mold for my own MOTU bootleg buck body (Mr. Boneface being the first of
many to utilize it).

That’s all I have for this shop log. There’s a lot more that I’m
working on at the moment, so unless I get too busy (which is a very real possibility), I’ll try to provide plenty
of updates in the days to come.


Comments
Post a Comment