Crafting Experiment: DIY Reusable Molding Material
I mentioned before that I’ve been experimenting a lot with mold making and resin casting (both epoxy resins and fast-curing urethane resins like Smooth-Cast). I started out by dabbling with silicone rubber for my mold making but decided that it was a lot more cost effective (and less nerve-racking) to switch over to Composimold, a thermoplastic molding compound that can be melted in the microwave and reused to make different molds.
I recently came across a youtube video that showed how to make your own homemade molding compound from a mixture of unflavored gelatin, glycerin, and water that can also be melted in the microwave and reused. And while I’ve been having a lot of fun making molds with Composimold and I have about four pounds of the stuff, the video piqued my interest enough to want to try the recipe out for myself (even though I don’t really need to) just to see how it compares. But if you want to try it out for yourself (and don’t want to watch the video), here’s how you make it.
- Mix 4 oz of unflavored gelatin powder with 12 oz of glycerin into a sufficiently large bowl or pot. I recommend a digital scale for the 4 oz of gelatin and a measuring cup for the 12 oz of glycerin. Stir until the mixture is relatively uniform.
- Add 1/2 cup of cold water and stir well. Let it sit for five minutes.
- Add 1-1/2 cup of hot water to the mixture and stir well. After stirring, transfer the mixture to another container, pouring it from the mixing pot into a strainer to catch any large chunks of gelatin that didn’t absorb into the mixture. Note that I made two batches of this material and both times, I had zero chunks when I poured it over the strainer and into its second container. Though I have seen videos of other people making this material and ending up with sizeable chunks that don't fully dissolve into the mixture. Chunks or no chunks, everything should be fine.
- Let the material sit for about two hours in the refrigerator until it solidifies. I don’t know about putting this stuff in the freezer like you would with Composimold, but I don’t recall anyone saying NOT to do that, but your best bet is the fridge if you want to err on the side of caution.
As for how this DIY reusable gelatin-glycerin molding
compound might be used, please note that like all of my crafting projects on
this blog, this shouldn’t be taken as a “how-to” article but rather a “how I”
article. I am still a newcomer to mold making and I don’t want to mislead
anybody who might be reading this. What I would instead suggest is to watch tutorials
on youtube from experienced mold makers (like the gentleman whose video I
linked above as well as countless others who are just as easy to find on the
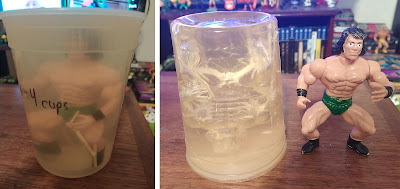
platform). With that said, here’s the first test subject…
A Transformers Robot Heroes Mirage mini figure. After
heating up the solidified molding material for two minutes in the microwave (turning
it back into a liquid), I gave it another minute or two to cool down so as not
to melt the hot glue that I used to secure the figure’s feet and the wooden skewers
I used as air vents to the bottom of the Solo cup I was using as a mold container
(I hesitate to call it a mold box because, well, it’s clearly not shaped like a
box). I popped it into the fridge for about an hour and a half and cut off the
plastic cup to reveal the mold within. Instantly I noticed how much clearer and
more translucent it was than even brand new Composimold, as well as how much lighter
and easier it was to cut with a hobby knife (but that might be partially due to
the fact that I let Composimold-based molds harden in the freezer). While the
mold itself showed promise, the real test was how well it would take resin.
Before going any further, please note that this material
should only be used for clear epoxy resins that don’t produce a lot of heat and
not fast-curing urethane resins like the aforementioned Smooth-On Smooth-Cast products.
While I have tested Smooth-Cast with Composimold and can confirm that it works and
doesn’t get hot enough to warp or melt the thermoplastic (albeit it is a bit
messy getting the cured flakes of white resin out of the Composimold after
demolding), I totally believe that urethane resins would get much too hot for
this lighter, less dense gelatin molding compound. Also I’m told that this DIY
reusable mold-making material isn’t good for two-part (i.e. “clay up”) molds,
which is why you’re only going to see one-piece cut molds here.

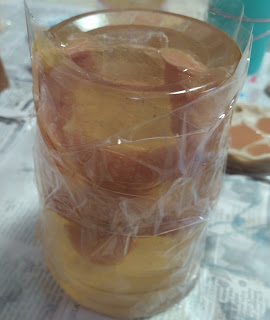
With all that said, onto the resin pouring. After securing
the Mirage mold with a rubber band and some clear packaging tape (don’t wrap
too tightly, just enough to hold the mold together and cover any areas along
the cut line that have the potential to leak), I mixed up some two-part epoxy
resin and since I wanted to make a classic G1 “decoy” Mirage, I added a few
drops of transparent blue resin dye. I forget the exact quantity of resin that
I mixed up at the time because I was pouring for several different molds at
once and not just this one. But since this is a small figure (about 2” tall),
it didn’t take a lot to fill up the mold. And speaking of filling up the mold,
it was extremely satisfying seeing the hollow cavity the original figure made
in the mold actually fill up with resin (which, again, the Composimold I’m
using is far to opaque for me to get a sense of how well a mold is filling up).
After giving the resin about 24 hours to cure before
demolding, I’d say the casting came out pretty good. Like all resin recasts, I
had some flashing to scrape off and sand down (not pictured here unfortunately,
below is my knee-jerk comparison photo) but overall I was pleased with the
result.

So much so that I cast another Mirage in red as a future Mirage-themed
crafting project began to take shape in my mind (see my lastest What’s On My Desk update).

Eager to see how the reusability aspect of the gelatin
molding compound held up, I melted the Mirage mold in the microwave and made a
new one with a slightly different pose. Despite two resin pours, the compound
didn’t show any signs of becoming cloudy or opaque just yet. This time, I cast
a Mirage with a few drops of transparent black added to the epoxy resin. Again,
aside some flashing and a few errant trapped air bubbles that I haven’t
completely tamed just yet (and probably won’t without the aid of a vacuum
chamber, but that’s not something I’m actively looking into at the moment), I
was again happy with the result.
I should probably mention here a pretty helpful tip I picked
up about epoxy resin that I’d like to share. Once the A and B parts are all
mixed together in a plastic or silicone rubber cup (you do occasionally get
those with resin kits), heat up some warm (not hot or boiling, but warm) water
in a mug. Let the plastic cup containing the resin float on top of the warm
water, but be extra careful not to let the resin spill into the water or the
water to get into the resin (I can’t stress this enough). Let the water warm up
the resin for about 3-5 minutes until the resin takes on a more liquid
consistency and all or most of the air bubbles rise to the top. Warm, liquidy
resin is exponentially easier to pour into a mold and allows you to pour it in
thin streams, which greatly reduces air bubbles. Just thought I’d pass that little
tidbit along.

But I wasn’t going to stop there. It was time to move up to
a slightly larger test subject, namely the 4” scale Mega Merge action figure of
Solaire from Dark Souls that you may or may not have noticed lingering in the
background under the TV in a few of the photos I’d taken from my living room. Please
excuse the picture of the mold below, it was taken AFTER I demolded the figure
and while it was in once piece when I cut it and when I poured in the resin, it
ripped in half along the bottom. Like I said before, while incredibly easy to
cut it’s also not as durable as Composimold of silicone. So what I would
suggest is, if you have enough of the mold compound made up, try to pour it at
least an inch or two above the highest point of the object you’re making a mold
of to prevent your one-part mold becoming a two-part mold.
And if your mold rips like this, I don’t recommend using it
again because no matter how well you try to tape it up, it’s just going to
leak. But I’m getting ahead of myself here…

Wanting to evoke Solaire’s Golden Phantom look from the
game, I mixed some transparent gold dye into the resin though its coloration
was largely overpowered by the red glow-in-the-dark pigment powder that I also
mixed into the resin. As far as the casting itself, it wasn’t half bad. Given
that the figure’s tabard is made of a thin, rubbery plastic, I wasn’t expecting
it to come out 100% so I wasn’t disappointed there. His belt, however, proved
to be a magnet for tiny air bubbles. Believe it or not, the feathered plume atop
his helmet actually did come through the mold but it snapped off when the
figure tumbled off the windowsill where I left its glow-in-the-dark pigment to “charge”
using the natural light. Here’s a side-by-side comparison with the original
figure as well as some shots of it straight from the mold (after I trimmed off
the air vents I’d attached to his hands, of course).
You can’t tell from the picture, but the mold picked up all
the details on his helmet and even the chainmail on his arms and legs like any
other molding material would. Again, not half bad.


There was just one more thing I wanted to test out with the
gelatin molding material, something I haven’t even tried with Composimold yet…I
wanted to recast an entire 5.5” bootleg He-Man figure and I wanted to do it as a
single cut mold. For something like this, I’d normally attempt a two-part
clay-up mold but I got a wild hair and decided to just go for it (this stuff is
reusable, after all). I superglued on some pieces of wooden skewers to the
hands and legs to both act as air vents and hold the doofy barbaian upright in
the plastic deli container and, in turn, glued the bottom of the feet and vents
to the container.
Given that it’s such a large mold, I gave it a bit longer to
cool off in the fridge before I cut away the deli container and made my cuts on
either side of the mold to extract the original figure. So far, so good.
I did mix up quite a bit of resin to fill up the mold but I don’t recall it being a ridiculous amount. Maybe 80-90 ml(CC) tops. I mixed in a few drops of a tan resin dye that I think was intended for solid white urethane resins but it worked just as well on the clear stuff.
Aside from a few small air bubbles that pockmarked the face
(which I would later fill in with apoxie sculpt), I was once again pleasantly
surprised to see how well the casting turned out. I think being able to see the
mold actually filling up when I was pouring the resin helped me avoid the usual
pitfalls I run into on projects like this, like not pouring enough resin or
pouring too much, leading to excessive flashing and neigh unmanageable mold
lines along the cuts. I’m really looking forward to painting and customizing this
recasted figure (well, figurine) at some point in the near future.

Overall, this was a really fun material to test out and while it’s somewhat limited in its applications and by no means a substitute for Composimold or silicone, I do plan to continue using it alongside Composimold whenever I want to make a basic cut-mold of a random figure (which is what I recommend it for). For more complex molds and for fast-curing urethane resins, I’m obviously going to be sticking with Composimold and whatever silicone I have left over, but this stuff is still nice to have available and I’ll definitely be using it again in future projects.
I recommend this recipe for DIY mold-making material for anyone who wants to dip their toe into mold making and resin casting without having to shell out the money for a Composimold starter kit or on silicone rubber that, while you might find a small trial kit for a price comparable to what you might pay for a 16 oz bottle of glycerine and a one-pound container of Knox unflavored gelatin, it doesn’t leave room for mistakes and if you’re a beginner mold maker…you’ll be making a lot of them. This entry ended up being a lot longer than I thought, so I’ll end things here. Give this recipe a shot, have fun, and if you screw up you mold, just pop it in the microwave and try again.


Comments
Post a Comment