Crafting Experiment: Silicone Mold Making and Resin Casting (First Attempt)
This is something that I’d been wanting to try out for a while and since Amazon had some solid deals on small quantities of silicone rubber and epoxy resin around Black Friday and Cyber Monday, I decided to finally give silicone mold making and resin recasting a shot. I’ve watched youtube videos on recasting action figures and miniatures, but for the most part, I going into this cold and following the directions on the little pamphlets that came with the respective silicone rubber and epoxy pouring kits.
My first test subject was this Red Ninja vinyl figure from
Prexio’s 2.5” scale GI Joe series that I found at the Dollar Tree a while back.
I started by affixing the figure’s feet to a cardboard surface. Remembering something
I heard in a youtube video about creating air vents because the hands and arms
often trapped air bubbles when pouring resin. For lack of any soft wax (which I
commonly see used to create air vents in silicone molds), I cut two pieces of
styrene rods and sticky-tacked those onto each of his hands and sticky-tacked
the bottom of the rods to the cardboard surface. That’s what those two holes were
on either side of the foot-holes in the mold.
After that, I placed a plastic cup upside down over the
figure and glued it to the cardboard with a hot glue gun before cutting off the
top. The duct tape was added because I was worried that it might still move
around when I was pouring the silicone rubber. There wasn’t much to the actual silicone
rubber mixing process aside from combining an amount from the bottle marked “A”
and the bottle marked “B”, stirring it for a couple minutes, and then slowly
pouring it around (not on top of) the figure.
Though looking at the final mold, there’s quite a lot of
wasted material used because of the comparatively large surface area of the cup
and I can definitely see now why a lot of crafters make their own boxes around
the subject of their mold to better cut down on using more silicone than they
need.

After the mold was fully cured (I think I waited an entire
day), I removed it from the cup and slowly, carefully started cutting from the
top of the feet and down the side while still keeping the mold in one piece.
The youtube videos advised cutting the mold in a zig-zag pattern so that the
mold would better fit back together and that proved to be a winning strategy,
since the cut-lines appeared almost invisible aside from the somewhat rougher
ones I made at the top. The figure was extracted without much effort.
Much the same as the silicone rubber, the epoxy resin was
also a two-part compound that needed to be mixed at a 1:1 ratio. I don’t quite
remember how much I mixed, just that it was considerably more than I ended up
needing. Since I wanted to recast the figure as a transparent red (the epoxy
itself was clear), I had a set of resin dyes that I bought for about $6 on
Amazon. Unfortuantely, none of the squeeze tips worked on any of the bottles so
I ended up having to pop off the top and manually pour some in. So, lacking the
accuracy of squeeze-bottle tip, I again mixed in too much dye. Hence why the resin
casting came out much more opaque than I would have liked. I let the resin sit
in the cup I mixed it in for five or so minutes to let the air bubbles rise to
the top, even using my heat gun (on the low setting) in brief intervals to
speed the process along.

I found pouring the resin into the mold a bit tricky on the
first go-round, so I used one of the little plastic turkey baster-like droppers
that came with the epoxy resin kit to fill up the mold. I did that about
halfway and poured the rest of the resin I needed into a Dixie cup which gave
me better control of the resin pour and allowed me to fill up the mold the rest
of the way (occasionally tapping the sides of the mold to maybe get rid of any
air bubbles that much be settling inside). I gave the resin about 12-14 hours
to cure before taking it out of the mold.
For a first attempt, I didn’t think the transparent red
recast looked too bad. I knew the hanging armor on the front and back likely
wouldn’t survive the process and there was a bit of air bubble damage in his
left hand (as well as some minor ones throughout). Again, my air vents were a
hack-job at best so I wasn’t expecting perfection here. Still I was impressed
by all the little details that the mold managed to pick up. You can’t tell from
the picture, but it even picked up the fine details of his eyes and mask, which
I wasn’t entirely sure would come through.

After cleaning up the flashing around the recasted figure
with a hobby knife, I decided to mix up some more epoxy resin. This time I used
about half of what I did previous (and still ended up with too much leftover)
and added a few drops of transparent green dye this time. This one came out
even better, with the resin picking up more of his hanging armor.
Here’s the original Red Ninja figure side-by-side with his Mountain Dew Code Red and Diet Mountain Dew counterparts:

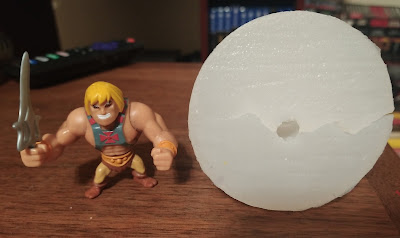
Since I only bought a small amount of silicone rubber and
epoxy resin for my little experiment, I had just enough left to make one other
recast. I chose to recast this 2” Eternia Minis He-Man (just not his sword as pictured). Prior to
molding, I made another attempt at creating air-vents from his hands to his
feet. Again, without any wax at my disposal, I made the vents using a
combination of sticky-tack and the 1mm thick armature wire that I use for most
of my sculpting. Sticky-tack was also used to fill in the holes in his hands
and at the bottoms of his feet.
Another thing I did differently for this mold was that I
used the head as the main entry point for the resin, using low-temperature hot
glue to affix him upside down onto the surface (this time, it was a blank wooden
placard I picked up at the Dollar Tree). I used a wider plastic cup that didn’t
waste as much space due to the figure’s broader proportions but again, there
was a lot of excess silicone mold space that could have been reduced if I made a more
form-fitting mold frame from scratch.
After I mixed up the epoxy resin, I poured it into two
different Dixie cups before adding some green dye to one and purple to the
other. When filling up the mold with resin, I alternated between pouring in the
green and purple resin until the mold was sufficiently full. I was a bit
surprised when the figure turned out to be more green than purple since, at the
time, it felt like I poured in more green resin than purple.
I was reasonably pleased with the results, since I intended
this figure for further customization purposes down the road. There were noticeable
air bubbles on his belt, his hands, and most noticeably on the top of his head
and shoulders. My air vents seemed to have headed off any air bubbles on the
bottoms of his hands but the sticky-tack filler proved ineffective in
preventing any air bubbles from forming at the tops of his hands. Maybe it was
because sticky-tack is too porous or I just didn’t do a good enough job of
filling in the gaps, but much like the other air bubbles, I can fix those with
milliput before I repaint the figure anyway.
But at least they serve as a guide for when to place new air
vents when I eventually get more silicone rubber and attempt to re-mold this particular
figure (or if I want to make one of my similarly proportioned Beast Man Eternia
Mini).

Despite overstuffing the mold, there wasn’t a lot of
flashing to trim off here aside from his air vents. Here it is side-by-side
with the original figure:

Mixing up what little epoxy resin that remained after my
previous experiments, I recasted He-Man a second time in sapphire blue. Unlike
the last attempt, no air bubbles formed in his belt-area and weren’t anywhere
near as bad on his shoulders, but were especially heinous on the tops of his
hands. And there’s also a massive hole on the top of his head because I ran out
of epoxy resin before the mold could be fully filled. Unfortunate, but again,
nothing I can’t fix with a little milliput if I decide to use this resin copy
as the base for a custom figure down the road.

And here we are at the end of my brief dalliance with silicone mold-making and resin casting. I learned a lot about the process and I think I’m better educated about what measures to take when I inevitably try this again in the very near future, because if nothing else, this experiment has gotten me even more excited about all the potential this has for making custom miniatures (and I also want to try making a two-part mold for larger figures).


Comments
Post a Comment