Random Resin Recasts – Part 1
I enjoy experimenting with making molds and resin castings of random figures picked from either my collection shelves or (more often) the bits bin where I keep my customization fodder, so much so that I’m launching an ongoing series detailing my experiments in seeing which items I can successfully cast and which ones end up being total duds. This will be presented in a style similar to the test pieces shown in my DIY mold making article.
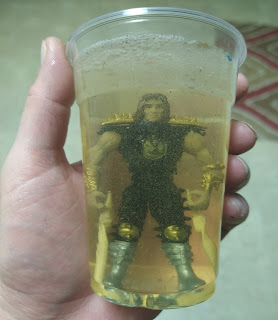
The first subject is this 3” figure from what I’m told is a
line of Medieval fantasy toys by Chap Mei, a company that is largely known today
for their generic soldiers, vehicles, and those weird dinosaur/animal playsets
you might stumble across on Amazon. I believe this figure is from the early
2000’s and I have no idea when I got it or where I got it from (most likely a
garage sale, thrift store, or random Ebay assortment like most of the things
you’ll see featured here). In any event, here it is in the mold. I used the
Gelatin-Glycerin mold compound to make this one.
Just like the pieces I select for my recasts, the color of resin dye I use is also random. Here I used a purple red, though you probably can’t see the purple (I know I couldn’t). I thought the casting came out really well, particularly the hands. Even though I took a bit of time adding the air vents, it’s still not a guarantee as you’ll see shortly…

I was pleased enough with how the red guy came out that I made two more castings from the same mold. The transparent blue one was the second one I made and for some reason that I don’t fully remember, his left hand didn’t turn out as well as my first and third efforts. I’m thinking maybe either not enough resin flowed in that partiuclar area on that particular pour or more than likely, it broke off when I was demolding it. The green guy’s hands casted as well as the first and had the added bonus of being the only one of the three where the original figure’s spiked shoulder pads came through, though unfortunately a slow leak in the mold robbed him of his feet. I filled them up when I was doing another casting, but for some reason, his ankles ended up being hollow (hence why his feet from the second pouring don’t quite fit).
If I end up doing anything
with these, I’ll leave the red guy as-is and probably swap some hands or feet
between the green and blue guy. Onto the next victim…

I had so much fun making resin duplicates of my Robot Heroes
Mirage figure that I decided to try my hand at recasting my G1 Sunstreaker from
that same toyline. Once again, I went with the DIY molding compound here
because I just prefer it over Composimold when it comes to making quick, overly
simplistic cut-molds (but fear not, you’ll be seeing Composimold make an
appearance a bit later on). It’s easier to cut, its more transparent so I can
see the resin filling up, and it doesn’t get as hot as Composimold, and thus, I
don’t have to wait as long for it to cool off after melting it in the microwave
before pouring it into a cup where a figure is secured to the bottom with hot
glue (in my experience, Composimold has a tendency to melt hot glue, causing the figures to float freely, ruining the mold).

As you can probably tell from the color, this used the same
batch of epoxy resin as the first knight guy. While there were some air bubbles
that I didn’t account for when I was making my air vents for the mold (namely
the sides of his head and under his arms), this one also came out well enough
for me to want to do something with later. Since there aren’t as many fun
variants and repaints of Sunstreaker as say, Mirage or Starscream or Optimus
Prime, my ideas for how I want to customize this recast are limited to his two Diaclone
variants: the red one (Spin-Out) and the police car one (Cordon). I’ll probably
go with the Cordon motif and make him a lightbar that goes across his chest.
Should be a fun quickie project (famous last words, I know). I would have tried
casting another one, but the mold split in half along the seam and like I
mentioned before, it’s not worth trying to tape back together because no matter
how hard I try to seal it up or what I use, a one-piece mold that’s split into
two will just leak on you and make for an incredibly frustrating resin pouring experience. So I melted it back down and moved on to the next thing.

As for the casting, I cleaned off most of the flashing with
a hobby knife and snapped a side-by-side pic with the original Robot Heroes
Sunstreaker figure. I would later use some Vallejo plastic putty that I bought
recently to fill in some of the air bubbles.

We’re not done yet! Up next are some luchador erasers that
were an ebay impulse buy a while back. I just thought they were incredibly
well-sculpted for regular old erasers, so much so that it would be a shame not
to at least try to recast them in a more permanent medium than eraser rubber. I
figured I would test the water by just molding one of them for now and while I
would like to eventually duplicate the fat one and possibly the guy doing the
warrior (namaste and all that), I would ultimately go with the orange guy sans his cape.

Due to the complexity of his pose, I decided that a “clay-up”
mold using non-sulfur, non-hardening modelling clay and Composimold might be the
best option here. And since I still have some deli containers (the very same
ones that I used to cast the bootleg He-Man figure previously), I decided to
try and make this mold following the same general steps from a video that I saw on the
official Composimold youtube channel.
I covered the back half of the figure in a bed of modelling
clay, put it in a deli container with a “window” cut out to pour the
Composimold, applied some mold release and bubble buster, secured the lid with
some tape and poured in the molten Composimold. And just like the youtube
video, I didn’t add any air vents because I was genuinely curious to see if I’d
get similar results by doing what they did in the company’s video. I let the
Composimold solidify a little bit at room temperature before popping it in the
freezer.

After leaving it for an hour or two, I took it out of the
freezer, carefully removed it from the deli container for later reuse, and
removed the clay from bottom of the mold. With the back side now facing up, I
put the mold back into the deli container, applied more mold release and bubble
buster (going especially heavy on the mold release this time so the two haves
could separate). I resealed the lid, poured on the second layer of Composimold,
and put the mold back in the freezer.

And here’s the finished mold, the luchador eraser now freed
to go back into his box. The mold looked good, but the real test would be
finding out how the figure turns out once the resin is cast. Like with all my
molds, I hold it together with rubber bands and then wrap it all around with
packaging tape to prevent any potential leaks before pouring in the resin
(again allowing the cup containing the fully mixed resin to float for 3-5
minutes in a mug of hot water to make the resin easier to pour in thin streams
as well as to get rid of some of the air bubbles).

My first attempt at casting this figure (the dark brown one)
was an abject failure. The hands came out find, far better than I would have
expected given the complete lack of air vents, but the face was a total
disaster and the finish (even though its hard to tell from the picture) was
covered in unsightly bumps and lumps, which I’m thinking results from Composimold’s
bubble buster spray and, no matter how much I try to smooth it out with a
brush, always clumps together in these tiny little pustules that completely
ruins the surface of whatever you’re trying to cast. I tried casting it a
second time where I didn’t use bubble buster. The result was generally better,
even though the left hand didn’t come out as well. I dyed the resin Rose Red
(which came out looking like pink lemonade) but since this wasn’t the only
thing I was casting at the time, I ran out of resin before it fully filled up
his feet (hence why they’re a different color, because I topped the mold up
later on).
Like with the knight guys, if I decide to customize this
luchador, I’ll probably take the left hand from the dark brown guy and glue it
on the pink guy before doing a full repaint.

And you know I can’t end this without
trying my hand at molding something big. The bootleg He-Man figure from last time turned out well, so I decided to up the ante a bit and try recasting a 6”
Optimus Prime from the Titan Warriors line of non-transforming, limited
articulation Transformers figures from around 2013-2014. According to the
tfwiki, there were only four G1 style Titan Warriors in total from that series,
of which I only have the Optimus and Starscream (the other two were Megatron
and Soundwave, though before seeing the wiki page, I would have sworn there was a Bumblebee too). While it
would have made a lot more sense to do a two-part mold or another clay-up mold
with Composimold, I wanted to keep pushing the limits of my DIY molding
compound like I did when I duplicated the bootleg He-Man figure.
And like the bootleg He-Man figure, I used yet another deli container, gluing Prime’s feet and to the bottom along with the air vents I glued to his hands. I wrapped several layers of thick plastic packaging tape around the upper lip of the container because it wasn’t tall enough to account for his head and I didn’t want to take the figure out after I glued it down and go through the trouble of finding another (more appropriately sized) mold box. It took all of my DIY molding compound to cover the entire figure (all two batches worth) and I was really nervous carrying it to the fridge. But thankfully, I made it without any major spillage. Here’s the finished mold with Optimus still trapped inside. You can very easily tell where the deli container ends and my improvisation with the tape begins.

His right arm had some minor issues due to its close proximity to the walls of the mold box (causing the mold around that area to be incredibly thin) but I was expecting that. All in all, the casting came out great. For the first recast, I used the same batch of resin as the second attempt attempt at casting the luchador eraser, hence why Optimus is the same rose red color.

I was so happy with how my initial Optimus Prime recast came out that I made another one. I wanted to dye the resin a translucent black for a potential “ghostly” Nemesis Prime custom but unfortunately I only had a drop of the black resin dye left so I just mixed in some white dye instead. My second casting turned out just as good as the first one. I either got really lucky with this one or the simple design of the figure worked out in my favor. Either way, I’m pretty thrilled with it and once I get some more epoxy resin (I have a whole gallon coming in the mail any day now), I want to try my hand at casting some Titan Warriors Starscreams as well. There’s a lot of fun customization potential there (Jungle Attack Starscream, anyone?).

I would have probably made a third one just because, but I only had a little bit of epoxy resin left and there was still a few smaller things I wanted to cast (namely a Snake Mountain fridge magnet and some more duplicated action figure stands). Here’s a final shot of the Optimus Prime mold (I split it in half after the fact to get a good picture) for posterity.

And that’s the first of what I hope to be many Random Resin Recasts in the bag because I have lots more cool stuff that should be fun to duplicate and customize.


Comments
Post a Comment