DIY Castle Grayskull Refrigerator Magnet
Last month I purchased a one-pound bag of ImPressive Putty mix by Composimold, which was about half the price of the pre-mixed ImPressive Putty and a pretty solid deal. My initial experiments with this material were somewhat disappointing, as it was implied that it could replace the need for non-sulfurus modelling clay that’s used in two-part/clay-up molds. This would, in theory, save me the time and effort of not only removing the modelling clay after pouring the first half of the two-part mold but the actual pouring of the second part of the mold. Sadly, due to the fact that even at its most malleable, ImPressive Putty cannot be made to be completely flush against the sides of the object like the regular non-sulfur modelling clay typically used in clay-up molds. This leaves considerable gaps around the object and not only makes filling the hybrid Impressive Putty/Composimold two-part mold to completion a crapshoot at best, it also leaves a ridiculous amount of flashing once the resin cures.
But thankfully, ImPressive Putty has other uses. When it comes to one-part push-molds, it far surpasses any comparable products I’ve used (Oyumaru Blue Stuff not being the least of them, since it can be microwaved in 30 seconds and you don’t even have to boil any water to submerge it in).
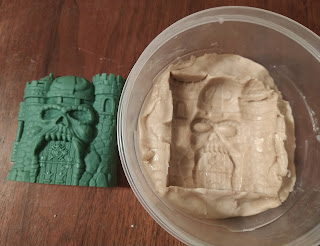
At any rate, I used ImPressive Putty to make a one-part push
mold of a mini Castle Grayskull and turned it into a refrigerator magnet. The
Castle Grayskull comes from one of the earlier waves of Masters of the
Universe Eternia Minis where the figures were packaged in a hollow plastic shell
shaped like the iconic stronghold (other waves came in a shell shaped like
Skeletor’s Snake Mountain hideout). I popped the front of the Castle Grayskull
off its hinge (which is easily reattached) and pressed it face-down into a warm
bed of ImPressive Putty, having allowed the material cool down for about five
minutes after softening it in the microwave. I placed it in the freezer for
about 20-30 minutes. Once the putty was fully hardened, I removed the original
piece and the mold was all ready for epoxy resin.
I mixed up some epoxy resin and let the plastic cup I poured
it in sit in a cup of warm water for about 3 minutes. As mentioned in my
previous article about resin pouring, this causes the resin to become easier to
pour and its air bubbles to better rise to the top. I added a generous amount
of brown resin dye just because, though in retrospect, I probably should have
used green resin dye because I would end up priming it in green anyway.

But no matter. Once the resin was cured, I was pleased with
how it came out (a few tiny air bubbles notwithstanding, though I wouldn’t even
notice them until later on). I did, however, go a little too heavy with the
mold release prior to pouring the resin, so the piece came out quite oily and
needed to be cleaned with an old toothbrush, a bit of cold water, and some
isopropyl alcohol.

After ensuring the piece was completely clean and dry, I
primed it first with Duplicolor adhesion promoter immediately followed by a coat
of Rust-Oleum Deep Forest Green spray primer (from their Camouflage
line of paints).

When the primer had fully dried (Rustoleum Camouflage tends
to dry much faster that their typical spray primers), I dry-brushed on most of
the basecoat starting with Vallejo Gray Green followed by a controlled dry
brush of Reaper Naga Green around the Jaw Bridge and other areas. I painted the
eyes and window with Citadel Abbadon Black. The door was painted using Citadel
Rhinox Hide for the wood, Leadbelcher for the silvery parts, and Runelord Brass
for the shield emblem. The Castle Grayskull playset has seen a number of
different color schemes throughout its many, many incarnations over the years
and I wasn’t trying to emulate any one of them in particular though I did take
quite a bit of inspiration for the recent MOTU Origins version for the door. I
also preferred the amount of vibrant green on the first release Castle
Grayskull from the early 1980’s and I took that as a major influence as well.

While it might be difficult to tell from the picture (my
camera was acting up and refused to focus for some reason), I next applied an
all-over wash using Citadel Nuln Oil followed by some more dry-brushing over
the masonry using the base colors of Gray Green and Naga Green. For the door, I
mixed some Vallejo Calvary Brown with some Vallejo Flat Earth (and possibly
lightened it up with a drop or two of Vallejo White) and dry brushed some
highlights onto the wood. I dry brushed the metallic parts with their base
colors as well before going back over the eyes and window with Abbadon Black.
Satisfied with my highlights, I sprayed the piece with a protective clearcoat
using a matte finish acrylic sealer.

Once the painting was out of the way, it was time to secure
the magnets to the back. I drilled out five indentations for the tiny craft
magnets using my dremel and made the mistake of going with some extremely
foul-smelling Loctite epoxy adhesive (the “self mixing” variety that comes in a
kind of syringe) because I wanted something strong. After 24 hours passed and
the malodorous goop had failed to harden in any way, shape, or form, I had no
choice but to remove the magnets and clean off the adhesive. It ultimately took
some acetone (which I also bathed the magnets in) and a fresh coat of paint on
the back. Thankfully, all the work I did painting the front of the piece
remained unaffected.
I used some Citadel Steel Legion drab on the back and while
it looks horrible, it’s not like anyone will be able to see the back side of
the magnet anyway. And it stopped the stink, so mission accomplished. After
hitting the backside with the same matte finish acrylic sealer, I used some E6000
to glue the magnets in place. This worked much better. I’m not sure what went
wrong with the Loctite adhesive, but it’s possibly due to the fact that it was
sitting in its package since at least 2015 when I’d purchased it (and never
used it until then).

Finally, my Castle Grayskull resin-casted fridge magnet was complete. I leave you now with a thrilling action shot of my new fridge magnet fulfilling its intended purpose:


Comments
Post a Comment