Action Figure Customization - Orc Warrior (Wrestling Figure Conversion)
When I’m gathering materials for future projects, it’s not often that I’ll see a piece and know exactly what I want to do with it but that wasn’t the case when I picked up this cartoony-looking Brock Lesnar wrestling figure for a few cents at a garage sale. I know right then and there that I wanted to turn Brock Lesnar into Orc Lesnar. How exactly I would go about doing that, I would figure out along the way.

The first step after cleaning the figure was removing any of
the visual cues that were decidedly un-orcy (to coin a phrase). After losing a
hair vs hair match against my dremel, the figure’s head was further wet-sanded
and to smooth it out. I hit the tip of his nose with the dremel as well to give
it a flatter, more orc-like appearance. I didn’t bother sanding down the two lumpy
indentations that it left in the nose because I figured that was a neat bit of texture.

I already had the head’s features in mind when I began
sculpting his ears and massive underbite out of milliput, which I believe might
have been my first time ever using milliput to actually sculpt something (as
opposed to just using it in Blue Stuff molds and to fill holes and gaps in a
model). The figure’s original head sculpt had a bit of a smirk and I wanted to
sculpt the jaw to more or less match and give my orc a touch of personality,
hence why it’s slightly askew. Once the milliput was fully cured, I sculpted him
some protruding teeth out of Green Stuff, which was probably the most difficult
part of this stage because I still struggle sculpting really tiny individual pieces
(even ones as basic as a cone-like tooth shape), even with the aid of metal and
silicone sculpting tools.

After making him some teeth, I had some Green Stuff left
over and used it to give him some furry boots. I textured it by lightly and
repeatedly jabbing the end of one of my metal sculpting tools into the putty (a
technique that I would apply for the rest of the fur I’d add to this build, and
I would be adding a lot more fur). I also started sanding down the edges of his
shorts and gloves to make them look less like ring gear and trim them back to
make way for the forthcoming modifications. Looking back, I wish I would have
gone over his gloves and between the fingers more with a sharp hobby knife
because that area was quite difficult to clean up.

Now it was time to create his outfit, which would consist of
a furry “battle skirt”, a loincloth over it, a He-Man style harness/chest armor,
and a pair of gauntlets. At first, I wanted to give him a circular chest piece
and thought the way I would do that would be to make the harness part out of
worbla and glue an armor plate on top of that which I would cut out of
plasticard. I set about tracing the pattern (using a miniature base and a
nickel as a guide) onto worbla and plasticard, respective. But once I cut
everything out and heated up the worbla, it looked like he had a large pizza strapped
his chest rather than armor, so I pried it off, reheated the worbla, and used
it as shoulder armor instead. I think it worked out better that way. I even had
some rhinestone (or whatever you call them) stickers from the dollar store to
add as studs to give the armor some added detail.


I moved on to the lower half of his outfit and cut a rough loincloth
pattern out of paper before tracing it onto the worbla twice because I wanted
it on the front and back. For the fur, I added some to fill the gap between the
legs but sculpted the rest around the loincloths after I heated them up and set
them in place. As the worbla cooled, but still retained some heat and
malleability, I frayed and pulled at the edges here and there to give it some
texture and a tattered appearance. I used scrap pieces of worbla (the area
between where I cut out the two loincloths) and trimmed up those to fit around
the top of his hands as his gauntlets. What scraps I had left over from those,
I used to make the straps that went around his wrists and over his palms. I
mentioned it before, but worbla is a tad on the spendy side so I try not to let
any go to waste.

At this stage, I still wasn’t sure what to do about his
chest armor but I knew plasticard would be out of the question. It’s just far
too rigid of a material to make armor that would fit around the contours of a
figure and not look incredibly awkward. Even heating up plasticard in hot water
doesn’t really do anything except make it more brittle, so I started
experimenting with worbla and stumbled upon a happy accident. I heated up a
piece of worbla to fit over the chest and lightly pressed it down over the
chest, but not mashing it down to where the thermoplastic permanently stuck to
the figure and looked too thin (like cloth). I was able to get underneath the
worbla and pry it off, and when I did, I noticed that the impressions left
behind by the figure’s chest gave it that perfect armor look. I didn’t realize
that it was just that easy to make chest armor with worbla (even though it
seems pretty obvious now) and I wish I would have done this for my Dead Cells Beheaded miniature instead of struggling with plasticard as much as I did.
From there, I added a back piece and straps (again from
scrap pieces of worbla) and pressed a sculpting tool into them to give them
some texture and attempt to create little clasps and buckles. That part of it
didn’t turn out looking all that great but oh well. At some point, I also added
rhinestone stickers onto the studded gauntlets as well as Green Stuff fur to
the wrists and boots (covering up the wrestling bootstraps because I can’t for
the life of me picture a fighting-mad orc having the patience to lace up his
shoes).

I took a snapshot at the end of the building stage (which I consider to be the midpoint in every project like this) and I was
pleased to realize that the only found part I added to this build was the
rhinestone stickers, having scratchbuilt everything else. I was also curious
about the worbla’s texture, hence why I brushed a little bit of silver paint
over the chest armor just to see how it looked.

Now it was time to paint and I was
chomping at the bit to see what this figure finally looked like painted green.
But in doing so, I noticed that there was a tiny bit of paint rub around the
neck when the head moved, but I was quickly able to remedy that by touching it
up and using a toothpick to apply a thin layer of superglue over the area to
act as a protective shield. I spread it over the area as thinly as I could with the other end of the toothpick before spraying it with the superglue kicker/accelerant.

Here’s the paints I used (if memory serves me correctly) for the basecoat:
- Skin – Citadel Deathworld Forest
- Teeth – Vallejo White
- Straps – Citadel Abbadon Black
- Armor – Citadel Leadbelcher, Citadel Runelord Brass (for the back of the harness)
- Eyes – Citadel Yriel Yellow
- Leather shoulder pad backing/loincloths – Reaper Leather Brown
- Fur – Reaper Desert Sand mixed with a drop of Mountain Stone
- Boots – Citadel Dryad Bark (would later change to a mix of Reaper Leathern Brown and Harvest Brown)

Applying the washes next, I knew I wanted to go heavy on the
fur and cloth with Citadel Agrax Earthshade to really dirty everything up and
seep into all the texture I made. But I didn’t know what to use on the skin, if
anything. I eventually wanted to see how it would look when I used Citadel
Athonian Camoshade since it’s a very thin green and apply an all-over wash to
the green to see if it shaded anything noticeable (it didn’t, but it still works
amazingly when blending in green camo patterns, which is why I bought it in the
first place). I also stained his teeth with Agrax Earthshade which produced the
effect I wanted but I didn’t wipe off enough of the wash that pooled in the area
under and around the teeth, which I really should have. It built up way too much and made it look like he had a bunch of crap stuck in his teeth, which I guess is fine considering this is a savage orc but it stuck out a bit too much for me.

After the washes dried, I touched up the green using the
basecoat color (Deathworld Forest) and dry-brushed the armor with Citadel
Runefang Steel and a little bit of Runelord Brass. It was here that I also
tried to change the color of the boots with some Reaper Harvest Brown and
Leathern Brown, having decided at the last minute that Dryad Bark looked too
dark compared to the rest to the point where it was distracting me. Something
about it just didn’t match. After lightly dry-brushing some Reaper Desert Sand
over the furs and Leather Brown over the loincloths, I felt ready to wrap this
project up with a protective clearcoat.

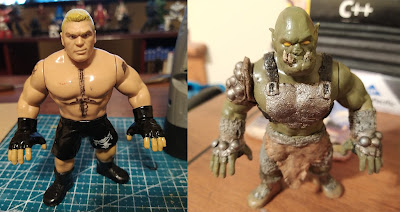
Aside from a few relatively minor things, I was really happy with how this build turned out (and probably had the most fun customizing it that anyone ever had with a garage sale toy that probably didn’t even cost a quarter). It gave me the chance to work more with worbla and Green Stuff, trying out a lot of new things that will help me out immensely in future builds. But probably the most rewarding part about customization projects like this is the before and after pic at the end showing off the drastic transformation.


Comments
Post a Comment