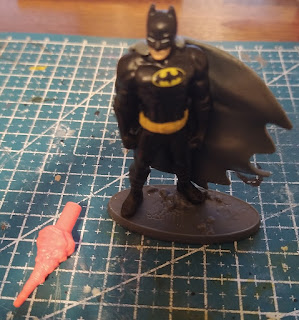
Miniature Customization – Dead Cells Homage (Dollar Tree Batman Conversion)
It’s tough to explain exactly what possessed me to attempt
to convert a Batman figurine from the Dollar Tree into a character that I wanted
to resemble the Beheaded from the game Dead Cells. Sometimes I’ll be going
through my bits bin and just start setting aside pieces and I find that more
often than not, these seemingly random pieces will dictate to you the crafter
how they want to go together. In this instance, the Dollar Tree Batman and a
fireball projectile that came from a larger 6” Spin Master Batman figure was
all that I needed to give me the push I needed in the direction that I wanted
to go.
And before I get too deep into it, I want to say right off the top that this isn’t meant to be a 100% accurate portrayal of the Beheaded since the sprite in the game is simplistic enough to leave certain details open to interpretation, which is readily apparent in the multitude of different variations you see in just about every piece of official art and fan art of the character. Think of this as my own unique spin on the Beheaded since I’m going to take more than a few liberties here with the design.
Step one in the building stage was to trim the peg off the end of the fireball and swap it with Batman’s head. The figurine’s cape was easy to remove and even had a peg of its own that slotted into the back (not unlike a GI Joe’s backpack accessory), allowing me to trim it up to resemble the Beheaded’s tattered scarf that flows. For his shoulder-pad, it was the cut-up remains of a Final Faction figure’s helmet leftover from my Ninja Commando Kitbash (and I swear, Part 2 of that entry is still coming very soon despite my having posted Part 1 back in August). I went over the cape’s edges with my set of handheld files to rough them up as much as possible.


Now here’s the part where I really start to incorporate some
new tricks and materials that I’ve just started playing around with, namely
Worbla and Green Stuff (though I think I might have used Green Stuff in
previous builds to fill in gaps, I don’t think I ever tried seriously sculpting
anything with it until now). If you didn’t know, Worbla is a thermoplastic
crafting materials that comes in sheets that (much like plasticard) you cut
into the shapes you want and then heat them up with a heat gun to make them soft
and malleable, allowing you to mold them around the contours of an object (kind
of like leather) and add additional details using sculpting tools before it
cools down. I decided to give Worbla a shot after seeing it used in the youtube
channel’s Custom Super Heroes builds and being amazed at what he could do with
it. While the stuff is a bit spendy, it works like a dream and is a total game-changer
for me.
And speaking of game-changers, I want to make a better effort going forward to work on my sculpting and incorporating it into my builds where I can (though it will only be little bits here and there as I gain familiarity with it). Here, I used Green Stuff to give my figure some baggy pants.

From there, I kept adding more features, giving him a Worbla
loincloth and sculpting wrist-wraps out of Green Stuff. And while I have seen
youtube videos of advanced Green Stuff sculptors make tape and weapon wraps for
Warhammer 40k miniatures by actually rolling Green Stuff out into a tiny thread
and literally wrapping it around the model, I couldn’t really get the hang of
it just yet and instead, I went the quick and easy route and blobbed some around
his wrists, smoothed them over, and made slits using the bladed edge of sculpting
tool.
And while it’s hard to tell since my camera didn’t want to focus, I also sculpted the “face”, which I would later add more Green Stuff to in order to make it stick out a bit more so that it would be easier to paint. While the starlike “face” is a simple enough shape on paper, I struggled with its proportions quite a bit.


With the chest armor sorted out, I went to work sculpting the rest of his scarf/cloak thing with Green Stuff, creating wrinkles and folds with a wet hobby knife and bladed sculpting tool. I should note here for anyone who has never used Green Stuff before is that you need to keep your fingers and tools damp when you’re working with it because it’s incredibly sticky otherwise, which is a big reason why I shied away from using it too much in the past.


For the basecoat, I decided to go with something more akin to his default color scheme rather than any of the more off-the-wall outfits you can unlock in the game. The paints I used (off the top of my head):
- Scarf/Cloak and Sash/Loincloth = Citadel Mephiston Red
- Head = Citadel Abbadon Black
- Pants and Wrist Wraps = Citadel Reikland Fleshshade mixed with Dryad Bark and (I think) Vallejo White.
- “Face” = Citadel Averland Sunset (though I would later go back over it with Ydriel Yellow)
- Torso and Boots = Citadel Mechanicus Standard Gray
- Skin (hands and arms) = Citadel Macragge Blue mixed with Mechanicus Standard Gray with a touch of Corax White
- Chestplate and Shoulder Pad = Citadel Leadbelcher
- Base = Citadel Deathworld Forest
As always, I mixed at least one drop of Vallejo thinner medium into each of my colors before applying them to the figure. His pants probably took the most coats to cover, followed by the plasticard chest plate (which I would add additional scratches and chips with my hobby knife and filing tools to give it even more of that grungy battle-worn look.


I went as light as I could with the dry-brushing, mostly
sticking to the base colors to kiss the surfaces around the dark recesses where
the Nuln Oil pooled. The blue-gray skin and the tan pants, however, were mixed
with a drop or two of Vallejo to brighten them up more before I layered them
on. As mentioned above, I brushed over the Averland Sunset face with Ydriel
Yellow because I felt that it popped out more. For the armor, I dry-brushed on
some Runefang Steel over the Leadbelcher (further darkened by the Nuln Oil
wash).
To finish it off, I dry-brushed a small amount of Mechanicus Standard Gray over the high points on his head to try and emulate a smoky effect. I probably could have layered on a few more lighter shades of gray to really drive the point home, but I felt content stopping there.

Another new thing I tried out in this project was finally
putting to use a matte clear coat/sealer that I’d purchased a while back (as
opposed to the glossy clear coat I’d been using up to this point). I’ll
probably alternate between the flat finish clear coat and the glossy one going
forward, depending on the project. I know I said before that I like how the
glossy finish feels and how it catches the light, but I really don’t have that
strong of a preference.
For miniature conversions that are as drastic as this one, it’s always fun to end things with a before and after shot to see how far the project came from its origin point.


Comments
Post a Comment