So I finally got the methyl ethyl ketone/MEK in the mail
yesterday and I should, in theory, have everything I need now to prep my
flexible resin castings for paint per the method I picked up from Rainbow Yawn (who, to recap, was having the same problem that I was with his bootleg He-Man
figures). I had trouble sleeping last night, so I finished dremeling my
castings. My neighbors just moved out not too long ago so I wasn’t worried (and
I doubt they would have heard the dremel through the walls anyway). I probably don’t
need to tell you how much quicker and more efficient this was than continuing
to take a sanding sponge and little sanding sticks to everything.
I
also mixed up some Milliput for the first time in forever and filled in some of
the more persistent air bubble holes, particularly in the left foot on some of the
castings as well as other holey areas that didn’t respond well to my earlier
attempts at surfacing and sanding them away.
.jpg)
During my lunch break, I had an hour to kill so I put on all
my PPE (half-mask with filters, splash goggles, and butyl gloves with cotton
gloves underneath) and started washing as many pieces as I could with the MEK.
I dampened some cotton pads with the MEK before using them to wipe down the parts,
going over them at least twice before setting them aside in a separate box to
air dry. Butanone’s are a lot like acetone or isopropyl alcohol in that they
dry out pretty quickly and don’t leave a residue (at least none that I could
see), so I don’t bother wiping them off after apply the MEK.
I’ll
probably finish cleaning the rest of the parts after I post this update and
then hopefully tomorrow, I’ll see how the painting goes with a “pilot” figure
before doing the rest. Fingers crossed. I know it worked for Rainbow Yawn but
it feels like I’ve been on pins and needles this entire month waiting to see
how this paint prep would turn out for me.

Even though I finally got my MEK and scratch-resistant 2K
automotive clear coat, I was still compelled to continue my experiments with
using Angelus brand leather paints on flexible resin, this time using the
Baltard figure made from my clean-out castings made for no other reason than to
season the molds (hence why he looks like complete garbage and I made no effort
to clean up the mold lines or fill in any of the air bubble holes). What I want
to find out here is: if I prime the figure with Angelus paints (which are made
to flex with leather without cracking and are commonly used on rubber soles as
well), paint over that with regular acrylic hobby paints, and then paint over
that with neutral/clear Angelus leather paint…will the paint job still flex
without cracking?
After washing the figure in soap and water, I primed it with
the Angelus black paint. Then I slopped on some Reaper Dragon Blue after
picking the paint at random. Again, this is just a paint test so I’m not overly
concerned with how it looks or how well it covers. But since he kind of looked
like Dr. Manhattan, I used some Citadel White Scar paint to give him some
pupiless white eyes. Then I applied the layer of neutral Angelus paint over
that and I’m giving it the full 24 hours to let it dry. We’ll see how the paint
passes the bend test and if it works, I might just hit it with the 2K anti-scratch
clearcoat and see if that will help it pass the fingernail scratch test as
well. If it passes, that would be a fairly big development as I didn’t wash
these particular pieces with MEK (having started this paint test a day or two
before it arrived in the mail).
.jpg)
I’ve
been practicing a little bit more with polymer clay in my ongoing effort to
teach myself how to sculpt designer/art toys. Inspired by a video from Evil Roy, another youtuber who I really like. I wanted to try to make an articulated
ronin samurai figure just to see if I could. It turns out that I couldn’t. When
I got to the arms, I realized that I was in way over my head and ended up
tossing the whole thing out. This isn’t the first time I got over ambitious
with a new hobby and I anticipate several more failures before I really feel
comfortable working with polymer clay. 
So I’m going to set my sights much lower on my next attempt
at sculpting. I’m thinking something along the lines of this more simplified sculpture from Evil Roy. Or maybe I'll try to do something akin to one of these Kid Robot Dunny
figures pictured below. The original figure is the red one on the left, the
other two are epoxy resin copies that I made of it a while back with the intention
of painting them (eventually). Ideally, I want to start sculpting one really simple
art toy every day (okay, almost every day) but I probably won’t start that in
earnest until sometime in June for reasons I’ll get to at the end of the
update.
But as I mentioned before, one of my crafting goals for this
year is to sculpt my own designer resin art toy to mold, cast, paint and hopefully
sell in small quantities (but I’ll settle for just molding, casting, and
painting them). Hopefully a few months of consistent trial and error practice
projects coupled with whatever beginner’s polymer clay toy sculpting classes I
can find for free online will build up the bare minimum sculpting proficiency I
need to realize this goal.

And speaking of sculpting, another project I have my heart
set on (at the moment, anyway) is to make my own series of M.U.S.C.L.E.
inspired mini figures. The idea came to me as the result of some molding
failures, particularly when I tried to make molds of this Mexican Bootleg
Skeletor figure several months back. This was pretty baffling to me, because no
matter what parts I tried to mold (much like my fully-sized MOTU KO buck body,
this tiny bootleg Skeletor is also connected by simple ball and socket joints
on the waist, neck, and arms), the castings turned out poorly due to the
silicone that directly touched the master figure on the inside of the mold never
fully curing. This resulted in a silicone mold that picked up very little details
(and in the case of the head, none of the details) and blank, almost
featureless parts.
At first I’d assumed this was due to me possibly mixing the
silicon's Part A and Part B incorrectly, but my second attempt (using a
different brand of silicone too, no less) yielded the same results. That’s when
it dawned on me that it might be the squishy, almost rubbery plastic that I
likened to that of an old school (as well as new school Super 7) M.U.S.C.L.E.
figure. To further test this theory, I took a tiny bit of leftover silicone
from a different pour and made a silicone mold of a Super 7 luchador
M.U.S.C.L.E. figure that I had laying around (pictured next to the Mexican
bootleg Skeletor) and yes, I confirmed that silicone will not properly mold
figures made out of soft rubbery plastic.
That’s when I got the idea that I could still use the mold in
the picture to make my own M.U.S.C.L.E. figures by using it to cast “blank”
copies in hard epoxy resin (the clear and clear blue guy seen standing to the
right of the mold that spawned them), customize them with details made from Green
Stuff and maybe a bit of kitbashing, and subsequently make silicone molds of
those that I can later cast in squishy, flexible resin (and yes, unlike the
original material, casting them in epoxy resin will allow proper silicone molds
to be made of them, since I use this same method when I make custom head
sculpts for my MOTU KO figures).
It's just
one of the many ideas I have that I've gotten myself excited about. This should also give me some extra practice in
sculpting small details (though I’ve been doing that in most of my projects
anyway).
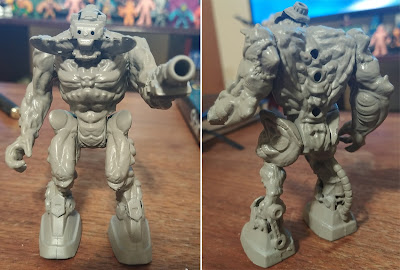
The last thing I did over the course of the past week or so was a
quick custom action figure that I started making on a whim last Sunday.
Impatiently waiting for my MEK to arrive in the mail, I felt the burning need
to paint something so I grabbed this Final Faction Brute figure that was taking
up space in my bits bin and started turning him into a Doom Cyberdemon-inspired
Cyber Brute. I swapped his feet with ones from a cheap Gundam model that I
built a while back, cut off part of his arm and replaced it with a cannon from
either a Batman or an Iron Man figure, and then kitbashed the rest of his
cybernetics with some extra pieces from Creative Assembly No. 57 robot models.

Then
I hit primed the figure with Duplicolor adhesion promoter before spraying on a
coat of Krylon flat gray primer. I still prefer my Rustoleum 2X Painter’s Touch
primer but it’s really overpriced online now and the nearest Lowe’s didn’t
carry it. But I’m happy with the Krylon.
For
the basecoat, I painted the skin with Citadel Bugman’s Glow with a few dabs of
Mephiston red to give it that demonic hue. The cybernetics I painted with
Citadel Leadbelcher. Maybe I should have painted them black first and then dry
brushed on the silver, but I still thought it ended up looking fine. I would
also paint the horns and the spikes on the back of the arms with a mix of Citadel
Krieg Khaki and White Scar, but that was after I took this picture.

Then I gave the figure a heavy black wash in Citadel Nuln
Oil. The sculpting on these Dollar Tree Final Faction figures are top notch and
the details are always a joy to wash and dry brush.

And speaking of dry brushing, I decided to go a few shades
lighter for the fleshtone to give it a more varied look and highlights that
would contrast nicely with the darker, more reddish basecoat. I achieved this
by mixing some Vallejo basic fleshtone with Citadel Kislev Flesh (and possibly
a tiny bit of Mephiston Red and Bugman’s Glow as well). I dry brushed some Vallejo
flesh tone and White Scar over the horns and what I assumed were his teeth to
give them a more off-white boney look
I
dry brushed on some Runefang Steel over all the cybernetic parts to make them
pop more though the lighting in the pic below makes it look like I accidentally
painted the cable on the back of one of his legs the flesh tone, which actually
wasn’t the case (believe it or not). I gave the figure a matte clearcoat
instead of a gloss, since I wanting to try out the Krylon brand matte finish
clearcoat that I picked up on the same trip to Lowe’s where I bought the Krylon
flat gray primer. I’d run out of the matte finish Aleene brand acrylic sealer
that I typically used when I didn’t want a glossy finish on a final piece and the Krylon stuff
appears to be just as good.
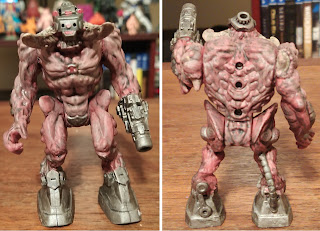
Oh,
and if you spin his head all the way around to where the horns are pointing up,
it looks like a completely different head that still fits with the overall
motif. I'll chalk that one up to a happy accident.
I
should probably note here that I’ll probably go radio silent for a bit, since I’ll
be going home to my family’s place in Ohio to puppysit for about two weeks and
won’t be bringing any of my crafting supplies. But once I get back sometime
before mid-June, expect some big updates about my first wave of MOTU KO figures
which I hope to have ready for sale on my Etsy shop if/when the painting is complete
and I have the packaging figured out (I’m thinking a polybag with a custom
header card). But I won’t take off without first leaving you with a before and
after pic of my Cyber Brute custom action figure:
.jpg)

.jpg)


Comments
Post a Comment