Action Figure Customization – Sunset Overdrive OD Mutant
This project started with a 40 cent bag of plastic junk I found at a thrift store late last year. And in that bag of junk I found this crappy McDonald’s toy, which is apparently Sharkboy from the 2005 critical and commercial failure The Adventures of Sharkboy and Lava Girl. In addition to being one of Robert Rodriguez’s many kid-friendly creative misfires throughout the years, I only know of the film because it led to Miramax being sued by a pro wrestler who also used the name Shark Boy (who settled out of court).
At any rate, I took this godawful movie’s hideous fast food
tie-in toy I turned it into a custom figure of an OD mutant from the excellent video
game Sunset Overdrive (originally released for the Xbox One in 2014 but later re-released
for the PC in 2018, which is where I experienced it after picking it up for
about $5 in a Steam sale). Call it serendipity, but there was something about
this figure’s massive head, weird proportions, and hunched posture that told me
that this would make a solid base for one of the rank and file OD mutants that
swarm your player character throughout the game.

After sanding the figure down and washing it in warm water
and dish soap, I dremeled out most of its head and grinded off all the costume’s
details. The figure had a fin on that back that may have acted as some kind of
action feature lever that may or may not have done something with the squishy
rubber chevron in the middle of Sharkboy’s torso. Whatever it was, I chopped it
off and sanded it down, removing the squishy rubber and everything else that
might point back to the figure’s shameful origins.
After that, I chopped off the hands and swapped them out
with the claws from a Dollar Tree Final Faction alien drone figure. To better
mimic the OD mutant’s shambling gait, I cut off the feet above the ankles and
turned them inward before supergluing them back in place as well as supergluing
the legs into a locked pose, leaving only the arms with any articulation. I
liked the way that looked but it made it a lot tougher for the figure to remain
standing (though I’d address that issue much, much later).

Jumping at the chance to use up some more of my bead
stockpile and leftover apoxie sculpt, I set about sculpting the head and chest.
While the putty was still soft, I stuck varying sizes of plastic beads all over
to represent the myriad growths and pustules. I scooped out a mouth and gums
and cut the ends off some toothpicks for its gnashing teeth. Like all of my
other video game-inspired builds, I’m not going for 100% game accuracy but
rather, I’m just cherry picking a handful of characteristics that are
immediately recognizable as whatever character I’m trying to make and take my
own creative liberties with the rest. For visual reference, I primarily worked
off pieces of concept art and the full-sized images of the regular OD mutants from
Steam trading cards, all of which vary a great deal from one another.

After the apoxie sculpt cured, I added some more details
using some Milliput and Green Stuff in various places (texturizing it by poking
it over and over again with one of my wax carvers), sculpted over the feet,
glued on some ribs and a spine from a dollar store skeleton garland (yes, I
still have some left over from last October), and made a new, sturdier lower
jaw (again using Green Stuff). I also added a few more beads because why not?

After finding a good place to stop in the bulding/kitbashing
phase, I primed the figure with Bulldog adhesion promoted and gave it an
all-white undercoat using Army Painter spray primer. I’d originally purchased
this for use with some Citadel contrast paints I picked up earlier this year
(the Army Painter spray primer was $10 cheaper than Citadel’s Wraithbone spray
primer, so I went with that instead) but haven’t had the chance to really play
around with those yet. There’s paint missing in the pics below because the
uniform undercoat informed me of some areas that needed a bit more sanding.
That’s a fairly common occurrence in a lot of my sculpting-heavy builds.

I wasn’t entirely sure about how exactly I wanted to paint
it, just that I knew I wasn’t going to try to match the game’s color palette (I’m
much too colorblind to even want to attempt that). Wanting to try out the
Citadel Rakarth Flesh paint my brother got me for Christmas, I base coated the
entire figure using only Rakarth Flesh. I was a bit surprised that it looked
like more of a light gray than a fleshtone (at least to me) but overall, not
bad for mutant or undead creatures. After a bit of hemming and hawing, I decided
that the piece needed some more detail so added some ooze to OD’s pustules in
the form of hot glue. After the glue dried, I sprayed the figure with a
protective clearcoat using matte finish acrylic sealer to reinforce the hot
glue. This is usually something I save for after I’m through painting, but it
doesn’t hurt applying a clearcoat between layers (though I rarely ever do
that).

Once that was out of the way, it was finally time to add
some much-needed color to the figure. Brushing on some Citadel Orruk Flesh from
a Warhammer set (again, another present from my brother, though this one was
for my birthday), I was blown away by how vibrant it looked. Here’s the paints
I used following the initial one-color basecoat:
- Skin – Mix of Citadel Orruk Flesh and Vallejo Fleshtone
- Oozing lumps – Citadel Orruk Flesh with a light drybrushing of Citadel Averland Sunset
- Teeth – Vallejo White
- Mouth (inside) – Citadel Bugman’s Glow

I wanted to make the colors pop so rather than going with a
typical shade using Citadel Nuln Oil or Agrax Earthshade, I instead gave the
figure an all-over wash using Citadel Athonian Camoshade. After making sure the
Athonian Camoshade ran into all the recesses and allowing it to dry, I
drybrushed on additional layers of the base colors listed above to add
highlights as well as some Citadel Tesseract Glow (transparent yellow)
technical paint to some choice pustules. I also added a layer of Citadel Kislev
Flesh, again dry brushing it in a few random areas to add a bit more variety to
the skin tones.

After I was satisfied with the final layers of paint, I gave
the figure another protective clearcoat, this time going with a Krylon crystal
clear glossy finish to give it that glistening, slimy look.
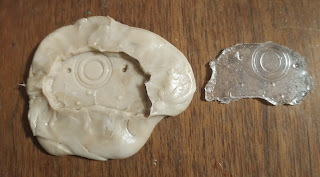
I was about ready to call it a day when I realized that
giving the figure a stand would make the project even better. So I took the stand
from a Boss Fights Studio zombie action figure (the one seen in my profile pic,
to be exact) and made a one-part push-mold using ImPressive Putty by
Composimold. After letting the mold cool in the freeze for about 20-30 minutes,
I removed the original base and poured some clear epoxy resin into the mold to
create my duplicate.
After priming the stand with Duplicolor (wanting to conserve
my Bulldog, though I still don’t think I’m anywhere near running out yet), I
sprayed it with a flat gray Rustoleum spray primer. Once it dried, I painted
the manhole cover/street drain (or whatever that thing is supposed to be) with
Citadel Runelord Brass. Everything else I painted with Citadel Mechanicus Standard
Gray. After applying a Citadel Agrax Earthshade wash to the pavement and a Vallejo
Dark Rust wash to the Runelord Brass, I dry-brushed on a layer of lighter gray
mixed from Reaper Mountain Stone and Reaper Dragon White to create what I felt
was a satisfying weathered look to the pavement. I might have also dry brushed
some Citadel Leadbelcher to the manhole/drain cover, though it’s not readily
apparent in any of the pictures.

After giving the stand a clearcoat of its own (going back to
the matte finish acrylic sealer for this one), I glued the figure’s feet to the
base and took some final glamor shots of the finished product.

While this project was a lot of fun, it was one I had to work on a little bit at a time as I tried my best to do my crafting around the hectic work schedule I had for the first month and a half of 2022. I have a lot of catching up to do on all my other creative projects (as well as all the new ones I keep starting because I can’t help myself), so hopefully closing this one out is a step in the right direction and the momentum-builder that I need to keep pushing ahead. I leave you now with a before and after pic:


Comments
Post a Comment