Like a lot of materials in my overflowing bits bin, this
Superman Returns figure was another garage sale find that took me a while to
figure out what I wanted to do with it. While I don’t really collect
superheroes, I’ve long been fascinated with the oddity that is Captain Ray, a
notorious collector’s item from Kenner’s 1980’s DC Comics Super Powers line. Or
rather, a Columbian-exclusive line called Defensores de
la Tierra that mix and matched pieces from pre-existing Super Powers molds to
create original characters. And much like Wonder Bread He-Man and Disco Skeletor,
the enigmatic Captain Ray has inspired a great many fan-made customs over the
years. Here’s mine…
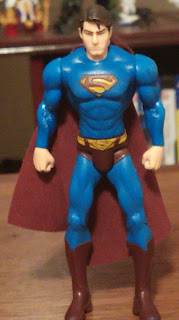
Pictured
below is my starting point, the original figure after a bit of light sanding
and a long soak in warm water and dish soap. I kicked around the idea of keeping
his cloth cape, but I never liked soft goods on toys and I would ultimately get
rid of it.
I
dremeled off the Superman shield off his chest and belt, though I later
discovered that I somehow missed two tiny emblems on the back of his boots.
After sanding down the elbow and knee joints, I went over them with some black
brush-on primer, let it dry, and then moved them back and forth to make sure no
paint rubbed off. That’s my quick and dirty joint test and an early warning system for any potential problem areas.

I wanted to keep the skin-color mostly the same and I knew
that I would be painting the trunks and boots yellow, so I popped off the head
and covered the hands, trunks, and boots with masking tape before I primed the
figure in Rustoleum flat black primer. If I would have left the trunks and
boots uncovered, I would have been spinning my wheels trying to get the yellow
paint to cover over black (and it wasn’t exactly a walk in the park to get the
yellow to cover over the existing red).
After
the black primer was sufficiently dry, I primed the figure again in Bulldog adhesive
promoter.
It should come as no surprise that the color scheme here is
a very simple one. Here’s the list of paints I used for the basecoat:
- Hair and suit – Citadel Abbadon Black
- Trunks and boots - Reaper Candlelight Yellow mixed with
Citadel Yriel Yellow (about a 50/50 mix)
- Belt – Citadel Mephiston Red
- Touch-ups on skin – Citadel Kislev Flesh
Apparently
I didn’t take a picture of the completed basecoat (or I did and I accidentally
deleted it off my phone), but here’s one where the basecoat was about three-quarters
finished.
After applying the basecoat and cleaning up the lines, it
was time to tackle his lightning bolt emblem. I cut a circle out of worbla,
fitted it to his chest but pried it off before it could fully adhere. That way,
it was perfectly molded to the contours of his chest and I could paint it
separately before gluing it onto the figure. For his lightning bolt and cape, I
decided to branch out a little and cut them out of a sheet of red EVA craft
foam. I’d purchased a 60 pack of EVA foam sheets (9.5x7.5” with 1mm thickness)
for $8 on Amazon a while back and almost forgot about it.
I tried making some permanent folds and creases in the cape
to make it look like actual cloth, but nothing really stuck. I even coated both
sides of the cape in Mod Podge and still no luck. I ultimately just spray painted
it with Rustoeum gloss red spray paint and moved on. For the lightning bolt, I
brushed over it with some Mephiston Red to better match the color of the belt.

This
was my first time working with EVA foam and I can definitely see myself using it
as a cheap, in-a-pinch material for armor and cloth pieces on quickie
projects like this one where I can’t really justify using a ton of my worbla
stock. The thought did cross my mind to make his cape out of worbla and (though
it would have produced a much better-looking result with natural-looking folds
and creases, the material is pricey and I really want to stretch out my current
supply for as long as I can.
After
supergluing on his cape and applying a little bit of Vallejo flesh wash in an
attempt to alter the skin tone a little (most of it I wiped off with a paper
tower), I hit the figure with a matte-finish acrylic clearcoat and called it a
day.
And
that's a wrap on Columbia’s “Master of Energy”. For a
quickie project, I’m happy with how it came out and I’m glad I got the chance
to work with the EVA foam I bought back in September. Apologies for the shoddy
picture quality in this article. I don’t know why, but my phone just refused to
focus every time I tried to take pictures of this project leading to some
less-than-stellar shots. And speaking of shots, I’ll end things here on a
before and after pic.


Comments
Post a Comment