Action Figure Customization – Sgt. Meltdown (Kenner Terminator 2 Homage)
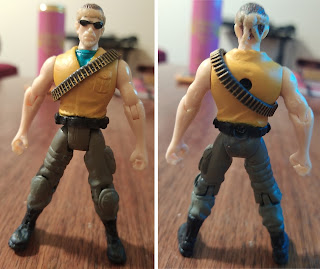
As I mentioned in my latest update post, I was working on customizing a random figure I found at a garage sale (exactly where it’s from and what company made it is still unknown) with the Meltdown Terminator from Kenner’s early 90’s Terminator 2 line and it’s strange yet eye catching color scheme serving as my inspiration. Pictured below is my starting point, the mystery garage sale figure.

After washing and lightly sanding the figure, tested the joints for potential areas where paint might rub off by painting some gray brush-on primer over the elbow and knee joints. After the brush-on primer dries, I move the joints for any paint rub. The process isn’t the easiest to photograph, hence the figure’s sick breakdancing moves.

After I made sure paint rub wasn’t going to be an issue, I disassembled the figure because I knew I wanted to prime the torso and legs in flat gray and leave the flesh tones the way they are. Lucky for me, this is one of those toys that immediately comes apart after simply removing two screws from its back.

I didn’t care for the figure’s collar so I sanded it off using a dremel. I wasn’t planning to go too heavy with the modifications but I knew there were enough little things about this figure’s base design that irked me to just to a straight-forward repaint.

After that, I reassembled just the legs and the torso and primed them in Rustoleum flat gray primer. After letting it dry, I primed the figure with Bulldog adhesion promoter.

For the initial basecoat, I went with the following paints (leaving the camouflage pattern for later):
- Shirt – Reaper Candlelight Yellow mixed with Citadel Yriel Yellow (about 50/50)
- Undershirt – Vallejo Blue Green
- Pants – Vallejo Green Grey
- Boots and belt – Citadel Abbadon Black
As expected, the yellow was an absolute pain and took an absurd number of coats before it actually started covering anything (and several more thin coats to stop the gray undercoat from bleeding through).
Once the initial basecoat was in place, I reassembled the figure and gave it a Rambo-style headband made from worbla and a bandolier from one of the many Fortnite figures I have in my bits box. It was here that I finally noticed that the figure actually had a goatee sculpted onto the face that, for whatever reason, was left as the same color as the face. I would remedy this shortly.
Not liking how the figure’s
default haircut looked, I decided to sculpt it a new one out of milliput.
Nothing too elaborate, I just mixed up a small amount of milliput, placed it on
the figure head in three or four strips, and then made some lines and waves
with a wet sculpting tool. I stopped once the putty started to resemble a short, disheveled haircut that one might imagine a slightly unhinged private military contractor sporting. At least, that's my nascent head-canon for Sgt. Meltdown anyways; a gun-for-hire with a short fuse and a loud fashion sense.
Around this time, I painted the headband in Citadel Castellan Green and the goatee Vallejo Chocolate Brown (which I would also use for the hair). I also primed the bandolier with Bulldog, gave it a coat of black brush-on primer, and dry brushed the bullets with Vallejo Gunmetal Grey before placing it back on the figure.

After painting the hair, I decided that it was finally time to tackle his camouflage pants. I wanted to stick to something relatively close to the color scheme to that of the Meltdown Terminator figure, so I went with a mix of Castellan Green and Vallejo Black for the dark layer and Vallejo Blue Green (lightened with a drop or two of Vallejo White) for the lighter layer. In the spirit of the 90’s Kenner figure, I also went with a different kind of camo pattern than my usual alternating mix of small blobs, dashes, dashes with a line, and dots. Instead, I opted for larger blob shapes and left more of the base Green Grey color than I typically would when applying camouflague. While it took several more thin coats to really fill in the camo blobs than it would the smaller patterns that I’m typically used to, I was still pleased with how it turned out.

After the camoflauge was complete, I went over it with Citadel Athonian Camoshade wash and touched up the messier areas (especially where the yellow shirt meets the black belt) as best I could. I tried adding a Vallejo flesh wash to the skin but it didn’t really have anywhere to pool aside from a few areas on the face and I ultimately ended up wiping most of it off.
I sprayed the figure with a protective clear coat of matte finish acrylic sealer (Aleene’s Spray brand, if you were curious) and once it was all dry, I gave it random Final Faction weapon to pose with. I do still have the little missile that fits into the launcher but the figure kept falling over whenever I had it in, so back into the bits box it went.

While it wasn’t the quickie project I might have hoped for (thanks in no small part to the struggle that comes with painting anything yellow, though I’m no longer trying to actively avoid the color), I’m quite satisfied with the finished product. I’ll close things out with the before and after pic. I wish I had the original Kenner Meltdown Terminator figure for an added comparison, but alas…


Comments
Post a Comment