Customizing My New Paint Rack
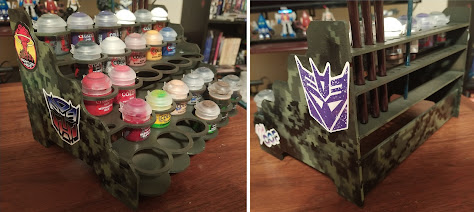
Since my collection of Games Workshop Citadel-brand paints has grown considerably with my purchase of a recent starter kit, I figured it was about time to give them their own storage rack. I went with a wooden Broken Token brand paint rack, which looked to be the right size for GW’s distinctive paint pots (and luckily, I was right). The Broken Token modular paint rack I bought has a total of 28 holes (each 35mm in diameter) for paint pots as well as 17 additional holes for holding brushes (though I already have one of those leather roll-up things that I prefer to keep my main brushes in). After assembling it and securing the slots with the last of my E6000 glue, I took a look at the completed rack and thought it looked rather plain and boring.
And I promise, it is wood even though the picture makes it
almost look like cardboard.

Luckily, I had some digital camouflage stencils I purchased
last year, two cans of Rustoleum camouflage spray paint (an army green and a
deep forest green) as well as the glossy black primer last seen in my bootleg Transformer redeco project. I had initially purchased the digital camo stencils for some of
my early scratch building projects (and ditto for the Rustoleum camouflage paint)
but found the sheets too large and unwieldy. But now that I had some flat
surfaces to work with, I figured I would give the stencils another shot. And out
of all my spray paints (of which I have a few), I pretty much only ever use the
flat gray Rustoleum for priming and the clear coat to seal in my finished paint
jobs, so I’m always eager to find a use for my more infrequent colors in the rare
event that one presents itself. And with that, I had a project for my Sunday
morning.
Deciding the darker forest green Rustoleum camouflage paint
would be the base color of the rack as well as the midtone for the camouflage
scheme I had in mind, I set about applyingthe first coat. I’d forgotten how
well this Rustoleum camouflage stuff covers and how quickly it dries to the
touch. Because of that, I admittedly didn’t give it the full amount of curing
time the instructions on the can recommends to cure (if I did, I would still be
working adding layers) but that was the least of my struggles with this
impromptu Sunday project.

No, the real headache came from the digital camouflage stencils
I’d set aside nearly one year ago as I was suddenly reminded why I confined
them in my crafting supplies cupboard in the first place. Much like my initial
attempt to use them, they proved to be too big and floppy to lay down flat
(despite trying to smooth them out, trying to stretch them taut and tape them
down with painter’s tape, and even trying paperweights to hold them down) yet they
were still too rigid to neatly wrap around any corners. While things worked out
a lot better using them on a flat surface, spray paint kept getting underneath
the stencils and ruining any chance of getting the straight, clean lines
promised by the stencil patterns. The only thing that I found that kinda-sorta almost worked was taking advantage of
the Rustoleum camo paint’s water-proofing properties and just kind of dampening
the surface so that the stencils cling to it a little better at the tradeoff of
the damp surface also interfering with the overall paint application.

Working around these limitations as best I could, I sprayed
the back panel and each side with the first camouflage layer consisting of the
lighter Rustoleum camo Army Green, allowing each surface to dry before pulling
off the stencil and starting on the next area. The set of stencils came with
about three different sheets, each with slightly different digital camouflage
patterns, so I mixed it up with each side laying down a different stencil in a
different orientation every time.

The second camouflage layer consisted of the Rustoleum glossy
black primer to provide that additional contrast between the first layer and
the basecoat with the intent to tie the whole pattern together. Aside from a
few problem areas where the stencils refused to behave, I was relatively happy
with the results even if they weren’t perfect. I wanted to spruce up my plain,
boring paint rack with a cool digital camouflage deco and my efforts provided
me with exactly that.

Despite the Rustoluem camouflage spray paints being designed
to be more or less waterproof and common used on boats and kayaks, I still
sprayed the whole thing down with a Krylon Crystal Clear protective coat to
seal in the paint job and allowed it to cure. When it was ready, I covered what
I deemed to be the “problem areas” in the pattern with some decals and stickers
I had lying around. This not only helped hide the crimes, it also personalized
my paint rack that much more.
Stencil-related woes aside, I had a blast with this custom paint job. Whether its miniatures with an original paint job or kitbashing or action figure conversions or a simple off-the-cuff project like this, I think there’s something to be said for the joy of customization. For me, it’s about imbuing something relatively drab and mundane with spark of creativity and claiming it as part of your own personal space. I think we all do this to some extent as an expression of our individuality and, perhaps even moreso, to feel like we're exerting some measure of control over a world that (in the grand scheme of things) permits us very little. Either way, it’s always fascinating to see.


Comments
Post a Comment