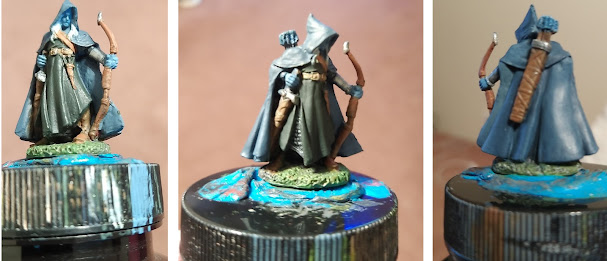
Mini Painting – Dark Elf Ranger
I started this project with one goal in mind: to apply the basics taught in the Reaper Learn to paint Minaitures kit. Nothing fancy or anything experimental outside of coming up with my own color scheme. So I opened up my Cigar Box of Unpainted Miniatures and picked out a miniature at random. That miniature was a Reaper brand Arthrand Nightblade, Elf Ranger. My secondary goal was to make this my first mini-painting project where I used Vallejo thinner on my paints instead of just drops of water (I’m told this is better for overall brush control and is more accurate with how the paint applies itself) as well as attempting to use a magnifying glass, though that wouldn’t come into play until later on.
- Make it a Dark Elf (and mix a skin tone that best fit what a Dark Elf looks like in my head, independent of any real influence from gaming, pop culture, etc).
- Make the hooded cloak a dark blue and the rest of his outfit a dark green, because those are the colors that (for whatever reason) scream “Dark Elf” the loudest.
- White hair (in retrospect, a kind of bright, almost neon light green might have served me better).
Everything else I was going to go with the more obvious
colors (Harvest and Leather browns for the belts and scabbards, Blade Steel for
the gauntlets and the bit of chainmail after a coat of black, that sort of
thing). For the cloak, I used three drops of Reaper Dragon Blue and one drop of
Reaper Pure Black. His outfit was three drops of Naga Green to one drop of Pure
Black. The skin took a bit of experimentation, mixing Vallejo Flesh Tone with
drops of blue and white and green but what I ultimately decided on was two
drops of Dragon Blue, plus one drop of Reaper Mountain Stone, and one drop of
Reaper Dragon White (I think I’ve been mistakenly calling it Pure White up
until now. Oops).
The boots I couldn’t really decide on, which were gray in the basecoat but I made them brown later on because the way this mini was sculpted, I had a hard time telling where his cloak and the ground ended and his boots began. Either way, I put down my basecoat on everything save the base which I once again forgot about until later. As you can see from the myriad mess-ups and missed spots, I didn’t employ that magnifying glass just yet (though it is a pretty nice one with a standee and three or four different LED lighting modes).
For the wash, I went with the more basic method I read about in the booklet for the Learning to Paint Miniatures kit and just mixed Pure Black with 4-8 drops of water (foregoing the Vallejo thinner medium for this step). I brushed the black wash onto everything and resisted the urge to slather on some Citadel Nuln Oil or Agrax Earthshade. I’m hoping I learned my lesson there. I should have waited for it to fully dry before taking a picture, but I was really excited with how the wash seeped into the crevices between the arrow shafts for some reason and I couldn’t help myself.
The face itself and the bear of a time I had trying to paint
inside that hood caused me to realize my first and greatest mistake with this
project, in that I should have painted the face and the entire area inside of
the hood Pure Black and, like an awesome youtube video I stumbled upon suggested, just
dry-brushed on the skin tone and allowed the black to provide automatic shading.
I initially wanted to paint the eyes yellow, but every attempt gave my Dark Elf
some accidental warpaint that I had to cover back up with the skin tone. So I
left the eyes unpainted, which was a bummer but I was weary of messing up yet
again and putting even more paint on his face so I decided to tap out before
that became too much of a problem. I know, Arthrand Nightblade deserves so much better.
As for the highlights post-initial dry-brushing (which were again just the basecoats with one drop of Pure White added), I learned that this was another thing I had trouble with for lack of a booklet telling me exactly what to mix and where to apply it. At that point, I was mostly concerned with touching up the miniature enough to get it to the point where I could walk away and not lose too much sleep over it.


Comments
Post a Comment